
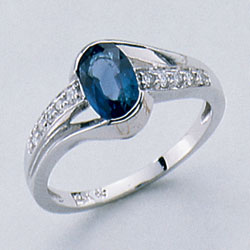
There are many reasons for wanting to lower a stone setting. First you must decide how you want to go about lowering the stone, this article focuses on one of the most common methods: making the stone sit lower in the setting. This only works if the setting is tall to begin with.
Step 1
Once you decide that you want to modify the setting, before you can begin you must clean the ring and remove the stone. To avoid damaging the stone, this must be done very carefully. Using a ring clamp, secure the ring and find a flat graver that is wider than the prong. Do not let the graver touch the stone. Using your thumb as a brace, slowly and carefully force the face of the graver against the prong, pushing up and out to lift the prong away from the stone. Repeat this step with an adjacent prong, for a four prong setting, and this will allow you to slide the stone out of the setting. Set the stone aside in a safe place.
Step 2
Now you will start modifying the prongs so the stone can be reset lower. With a flat file, gently file across all four prongs at once. Occasionally you must rotate the ring to ensure that the metal is being removed from the prongs evenly. Frequently check your progress and once you have filed the prong down to the point “where the full thickness of the prong remains” stop filing. Before you put your file away, make sure that the tops of the prongs are all even and level.
Step 3
With a piece of sticky wax, pick up the loose stone and place it over the recently filed setting to check the fit. Since you just filed away a good portion of the setting, the remaining setting should be a little bit too small for the stone. Take a chain nose pliers and grab the entire length of the prong. Carefully, one by one, pull the prongs out slightly. Systematically adjust each prong by moving them as needed until they are straight and evenly spaced. Modify the prongs in opposing pairs.
Step 4
Take the sticky wax, pick up the loose stone again, and check the position of the prongs again. If you look at the stone in the setting from the side, the gem should just barely cover the inside corner of each prong. It should also rest evenly on each of the four prongs.
Step 5
Now you are ready to cut seats in the prongs. This is a very important part in the resetting process and it requires extreme precision. Since the seat needs to fit the girdle of the stone, it is important to use a cutting tool that matches the shape of the stone as closely as possible. Use the bearing bur that most closely matches the size and shape of the stone to create the seats in the stone. It must be smaller than the stone but not so small that it can slip between the adjacent prongs. The seats must be level and fit the stone without any gaps. If the stone’s girdle thickness varies, raise and lower the bur as you make the seats to match the profile of the stone.
Step 6
Use oil or wax to lubricate the bur and to eliminate friction. You can use the bur to gauge the depth of the seats. Line the top of the prongs up with the top of the bur, always moving on the vertical and with the bur slowly spinning lower the bur into the setting. When the top of the bur reaches the height you want the girdle of the stone to sit at, move it toward one prong and make a small nick in the metal. Then move to the prong opposite the one you just nicked and nick it at the same height.
Step 7
Repeat Step 6 for the other two prongs.
Step 8
Continue to deepen the nicks in this systematic manner, always working with opposites until you have removed forty to fifty percent of the thickness.
Step 9
Once you have cut the seats, remove the metal flashing with a fine-cut file and then completely polish the prongs.
Step 10
The opening of the setting should now be just a bit too small for the stone to enter. Don’t worry, you haven’t made a mistake: this is exactly how it should be. The seat will be large enough to accommodate the stone. To insert the stone you will need to place it, table side down on the wooden bench top. Then gently push the setting down onto
the stone until the stone clicks into place.
Leave A Comment