
Have you ever wanted to make your own watch? With this watch kit you can assemble and customize your own watch. These step by step instructions will give you all you need to be able to DIY your own custom watch.
Tools Needed
We have assembled all the tools you need to Make Your Own Watch into a convenient kit here. If you do not have the kit, this is a list of the tools that you need to assemble your watch.
- Bench Mat
- Microfiber Cloth
- Rodico
- Dust Blower
- Finger Cots
- End Cutter
- File
- Sharpie
- Pin Vise
- Glue
- Hand Presser
- Dial Protectors
- Tweezers
- Movement Holder
- Case Holder
- Silicone Grease
- JAXA Wrench
- Spring Bar Tool
Step 1
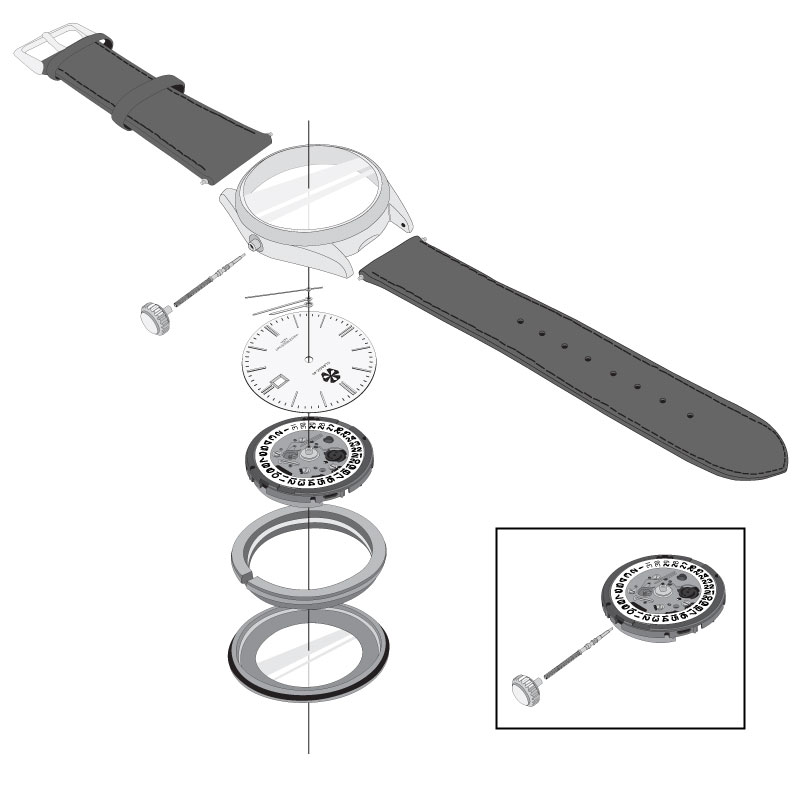
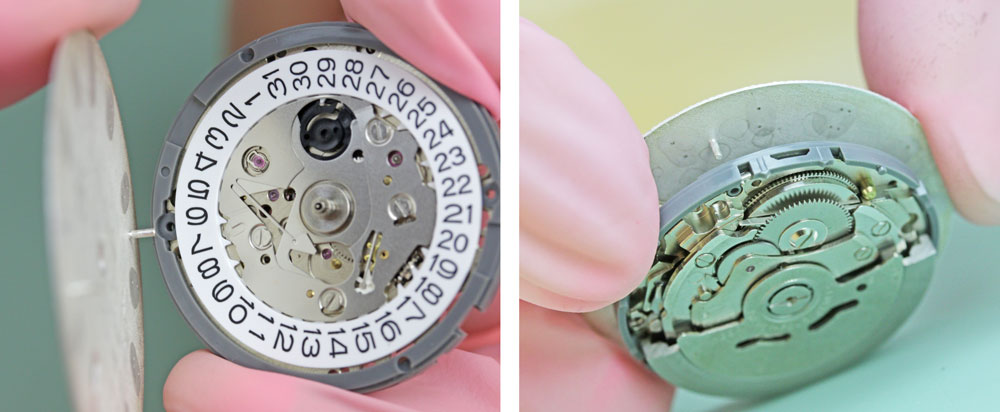
Lay out all the parts from your Make My Own Watch Kit and check with the parts list to identify each component. Remove the movement from its protective case and place it into a movement holder.
Step 2
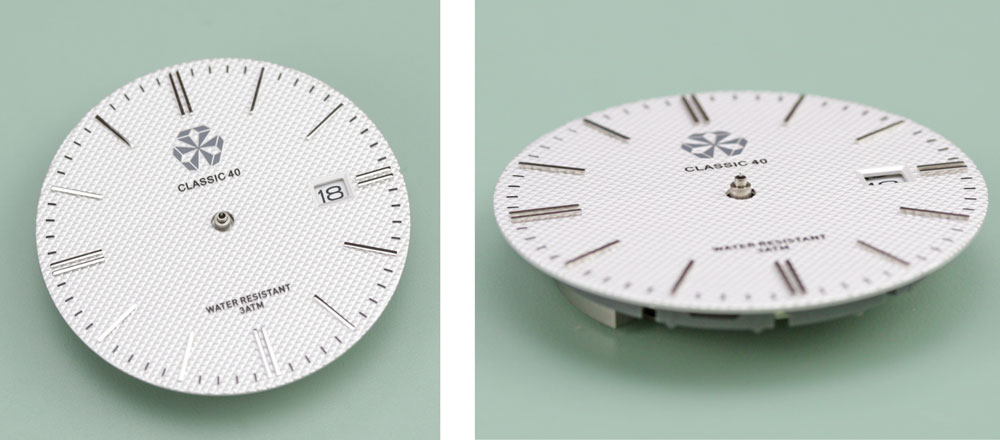
Attach Dial onto Movement
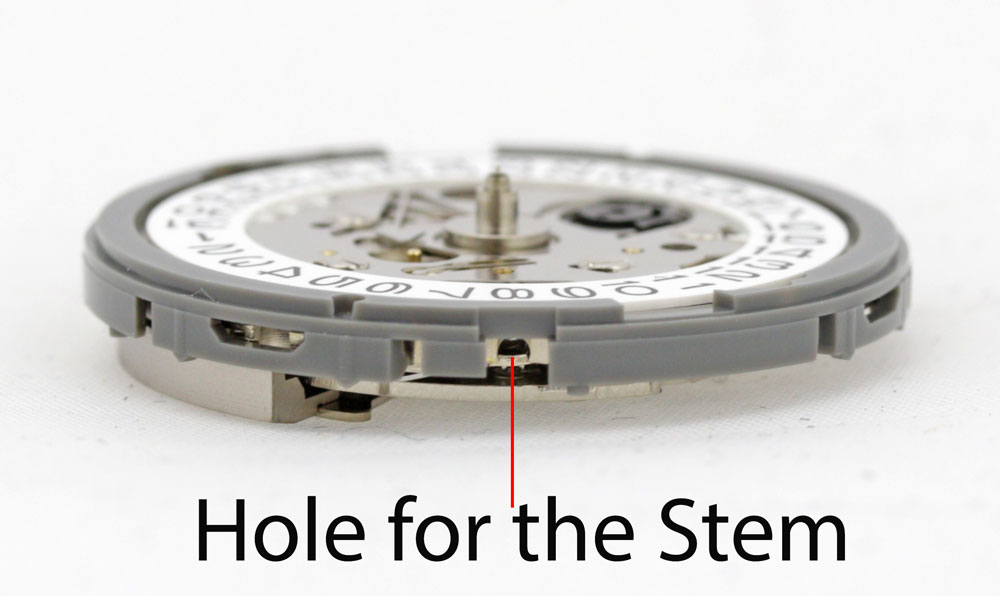
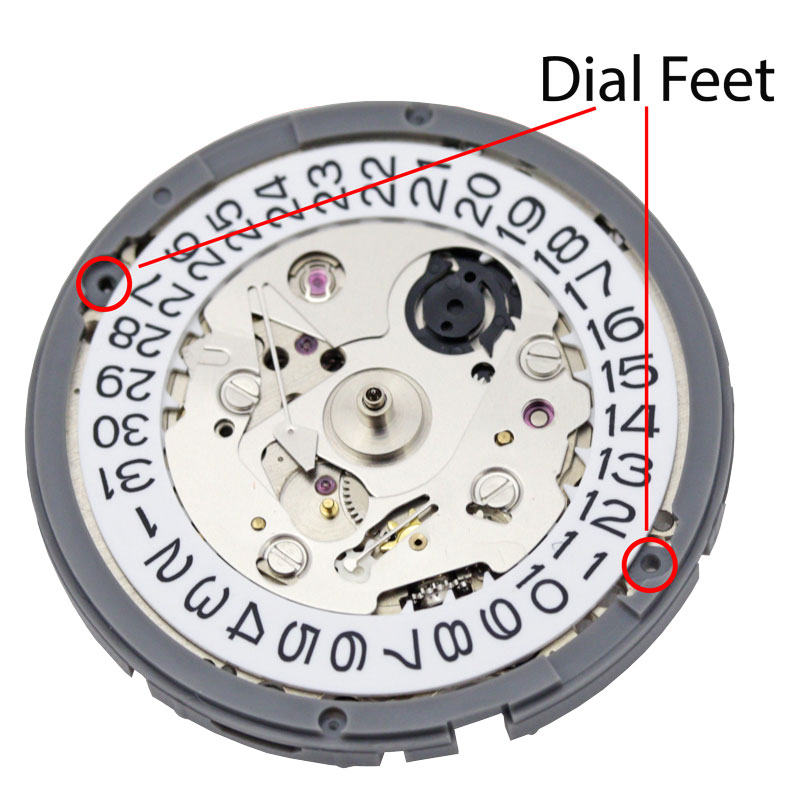 Line up the dial feet into the corresponding holes on the movement, make sure to orient the movement so the hole for the stem is in the 3 o’clock position and lined up with the date window. The dial is held onto the movement with the dial feet, which friction in. One or both feet can bend, if that happens you can use pliers to gently bend them back.
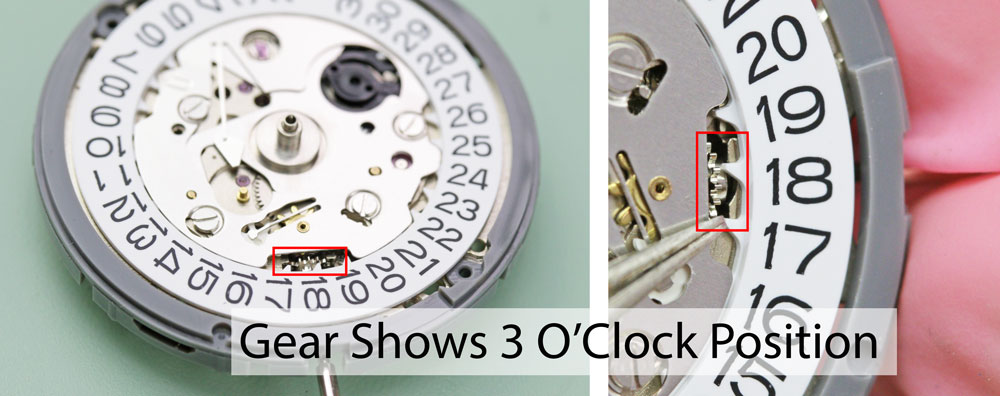 One way to identify the 3 o’clock position from the top of the movement is to find the gear. It is located above the hole for the stem.
 You’ll want to avoid scratching and smudging the dial, so use protective finger cots when handling parts. You can use rodico if you need to clean off dust or fingerprints from the dial.
Step 3
Insert the Movement into Case
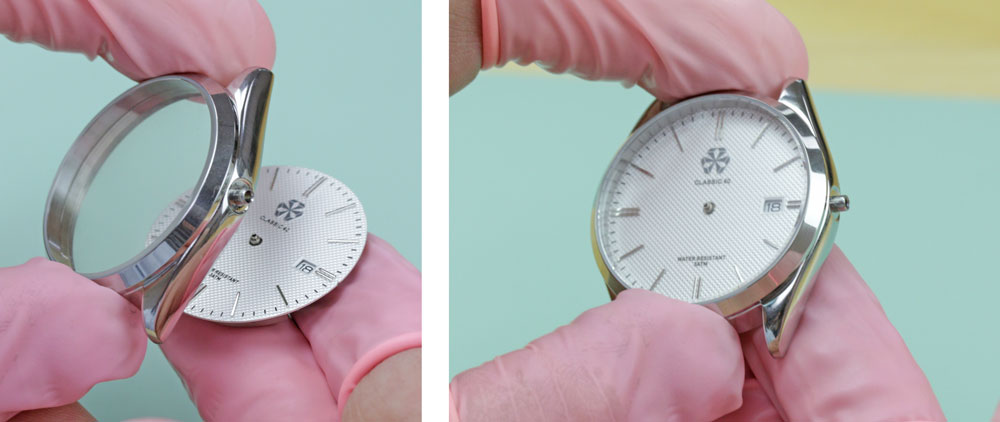 Place the dial and movement into the case with the dial facing down to the glass. Make sure to line up the date window on the dial with the tube on the case. Place the case glass side down on a scratch free surface.
Step 4
Cut the Stem to Size
The stem that comes in your kit is too long for the watch and needs to be trimmed to fit properly. The stem needs to be trimmed down to 15.15mm in overall length. Before cutting the stem you will need to measure out where you will mark and cut the stem. Measure the stem and using a sharpie or piece of tape and mark just outside of 15.15mm. *You don’t want to cut the stem too short. Your kit came with two stems in the event the first one gets cut too short or damaged.
Here are two methods to cut the stem to size. First method is using a digital caliper (not included with the Make My Own Watch tool kit) and the second is using the gauge that is included with the tool kit. Use a marker or piece of tape to mark where the stem needs to be trimmed to.
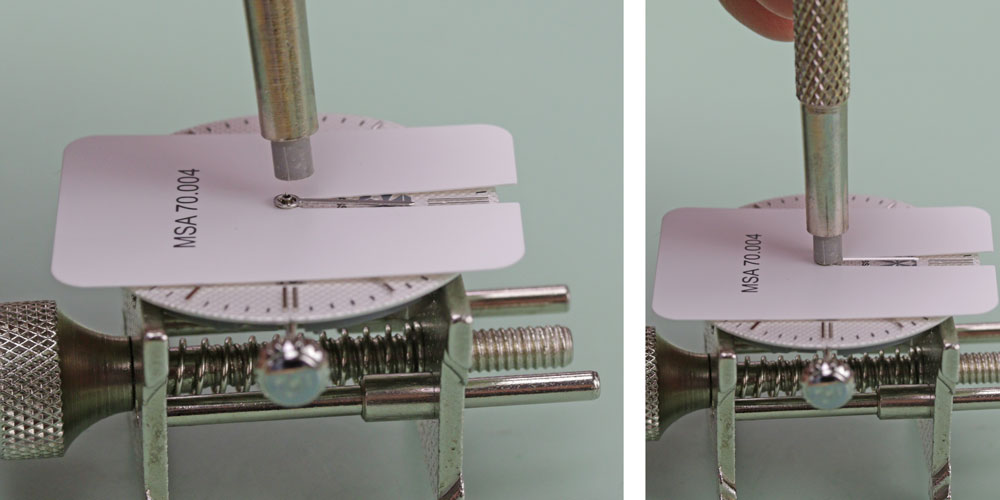
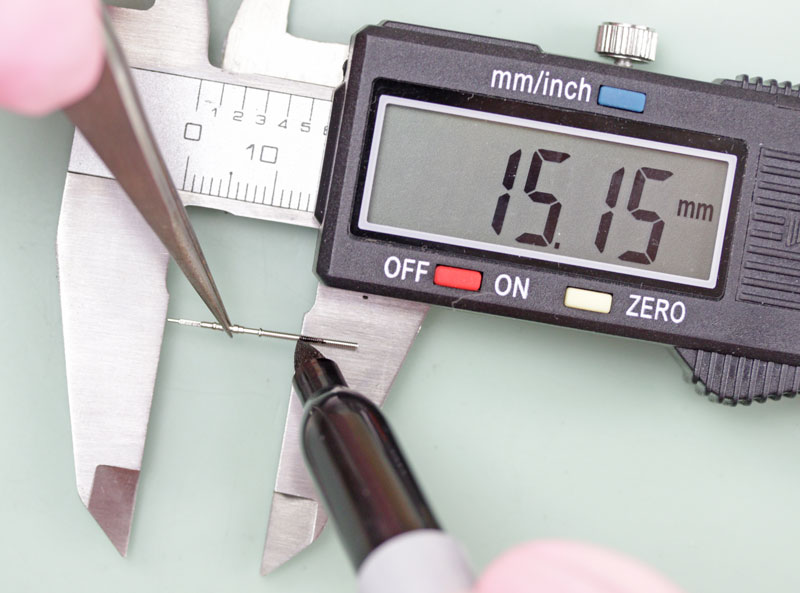 With the digital gauge, open it to 15.15mm and lock it with the nut so it doesn’t move. Use tweezers to hold the stem over the opening with the threaded side going over the top of the jaw. Mark the exact cut location with a sharpie or piece of tape at the jaw opening.
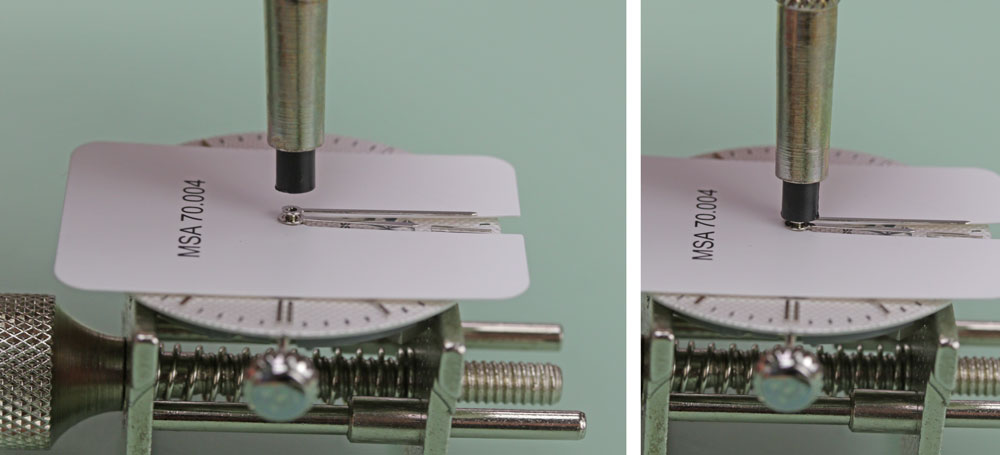
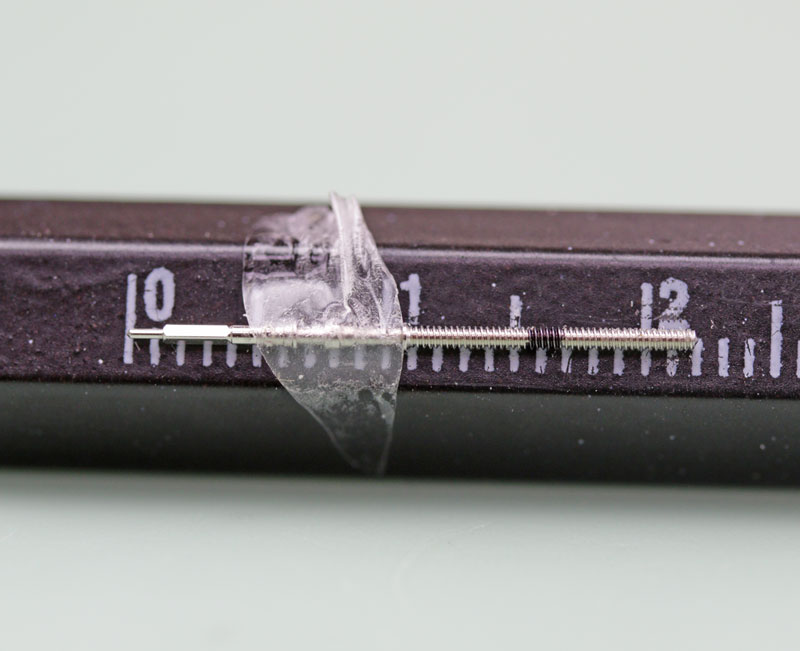 With the measuring gauge on the spring bar tool, tape the stem to the tool so the smooth end sits exactly at the middle of the zero line. Mark the cut location between the 15 and 16mm points.
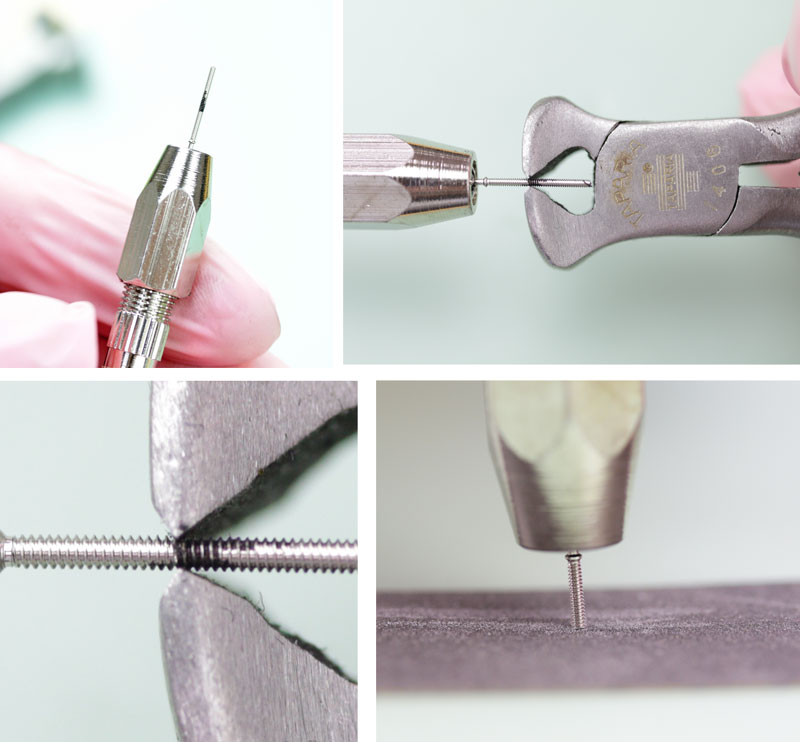 Insert the stem into a pin vise and use a side cutter, shear or end cutter (included with the tool kit) to cut off the excess where you marked the stem. Be careful no to cut too much off, as a stem that is too short will not work properly. You can always cut more off the stem if it is still too long after the initial cut. After you cut, there is often a fragment of metal left, use a file or piece of sandpaper to smooth the end of the stem. File the stem with the end perpendicular to the sandpaper for a flat, even finish.
 With the stem still in the pin vise, screw the crown onto the stem. Remove the stem and crown from the pin vise and insert them into the case and movement to make sure they fit correctly. Insert slowly until it is seated fully against the case and it clicks into place.

If the stem is too short, you may hear only one click, no clicks or it may not stay in the movement. You will need to start over with a new stem.
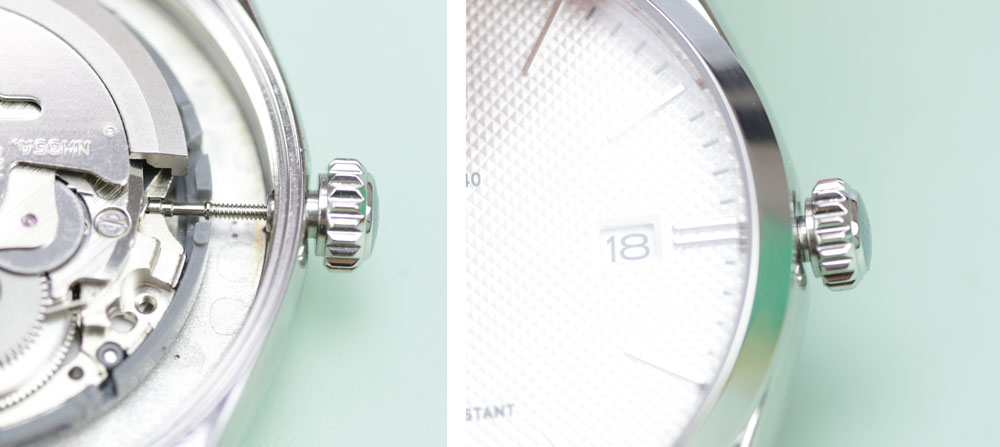
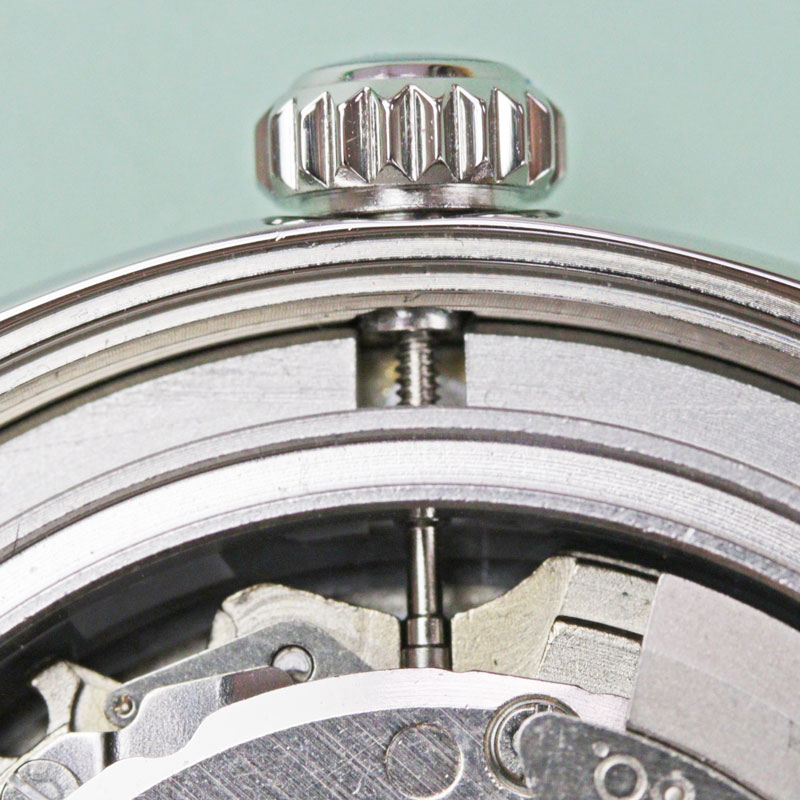
Stem is too long and does not sit flush against the case
If the stem is too long, the crown will not sit flush with the case when pushed in. The watch will still function normally but you risk dust and water damage without the proper sealing. Remove the stem, file it down slightly on the threaded end and try again.

Stem is the correct length and the crown is flush with the case
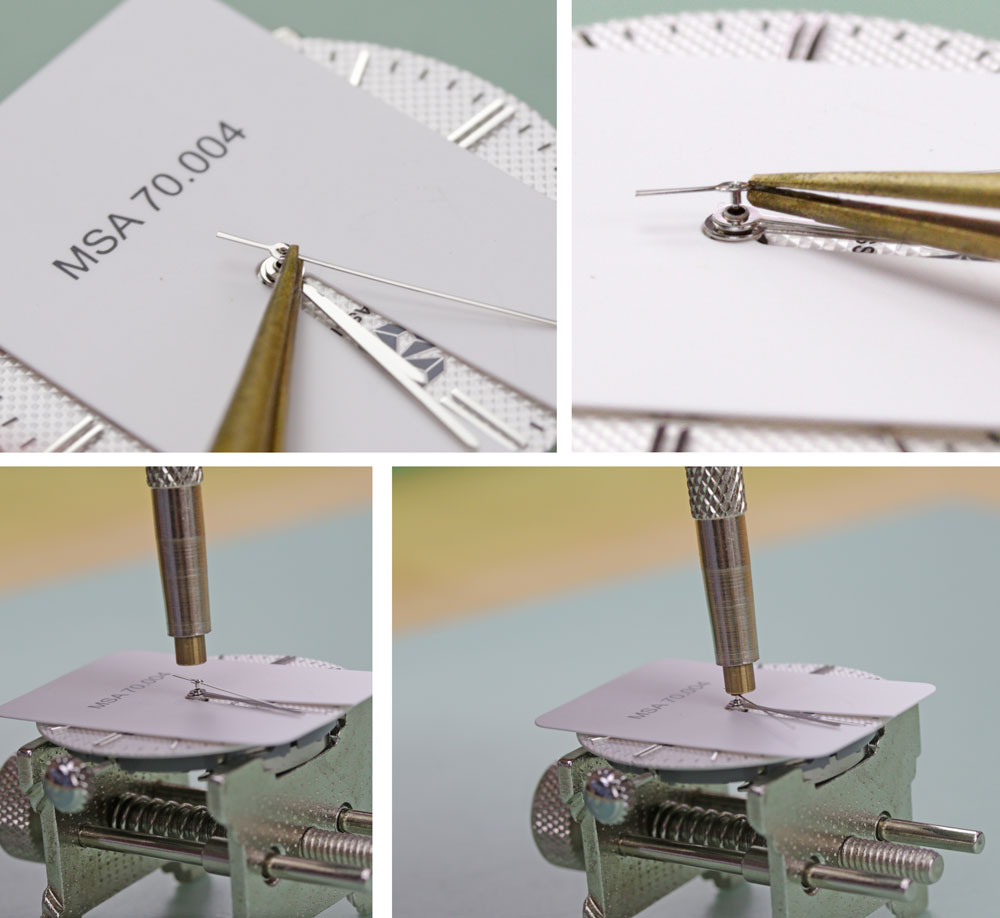
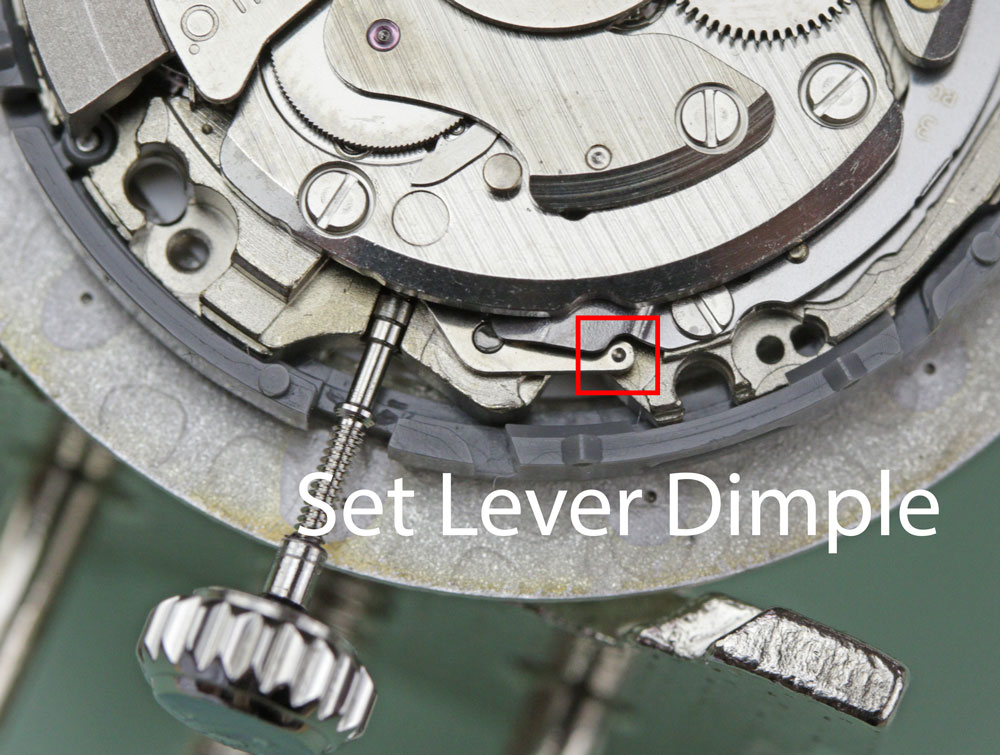 After you confirm that the crown sits flush and the stem is the right length, remove the stem from the movement. Release the stem by pressing down on the set lever dimple. The stem must be pushed all the way into the movement before you can remove it. The dimple will appear behind the 4 o’clock position.
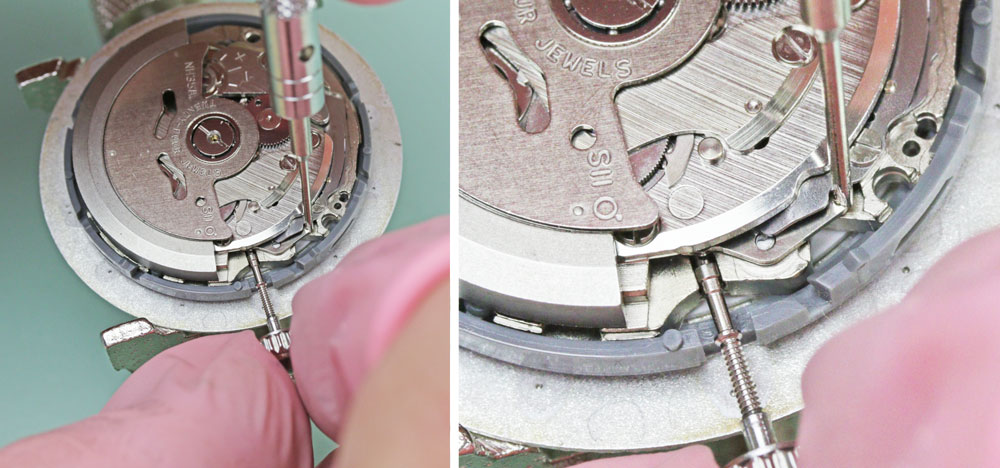 Using a pointed tool (screwdriver or pin pusher) press lightly on the dimple and pull the stem and crown out of the movement.
Step 5
Attach the Crown to the Stem
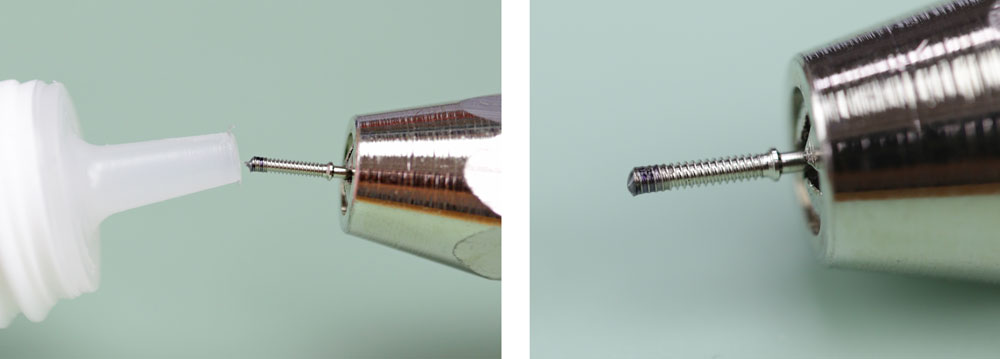 Place the stem into a pin vise and unscrew the crown. Place a small amount of glue or loctite on the threaded end of the stem and screw the crown over the glue as far as it goes. Set aside to dry for a few minutes.

At this point, you know that the stem is the correct length and the crown is attached to the stem. You can take the movement out of the watch case and are ready to install the hands.
Step 6
Align the Hands with the Date Change
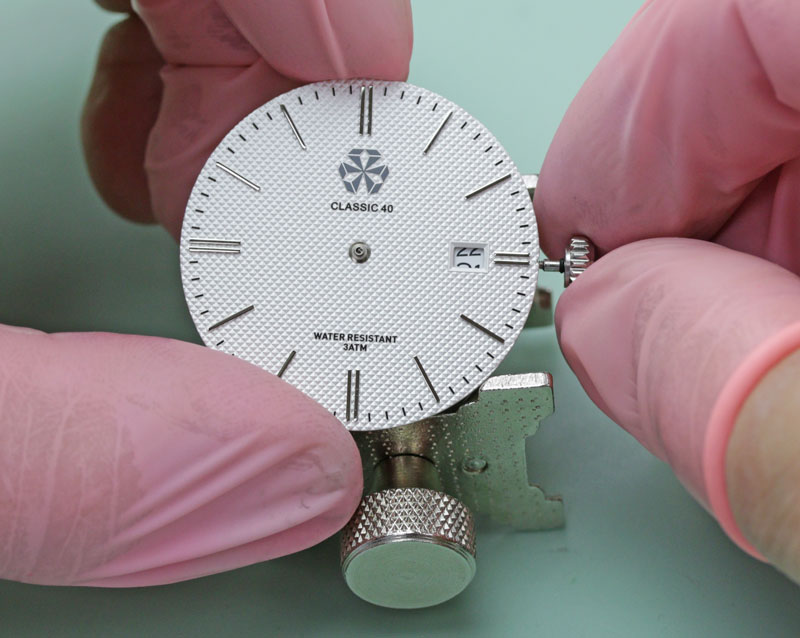 With the movement and dial (together without the hands installed), insert the stem and crown into the movement. Push the stem and crown all the way in, then pull out on the crown to the second click and turn the crown clockwise until the number date starts to change. When the date is between any two numbers, stop turning.
Step 7
Align the Hands with the Date Change
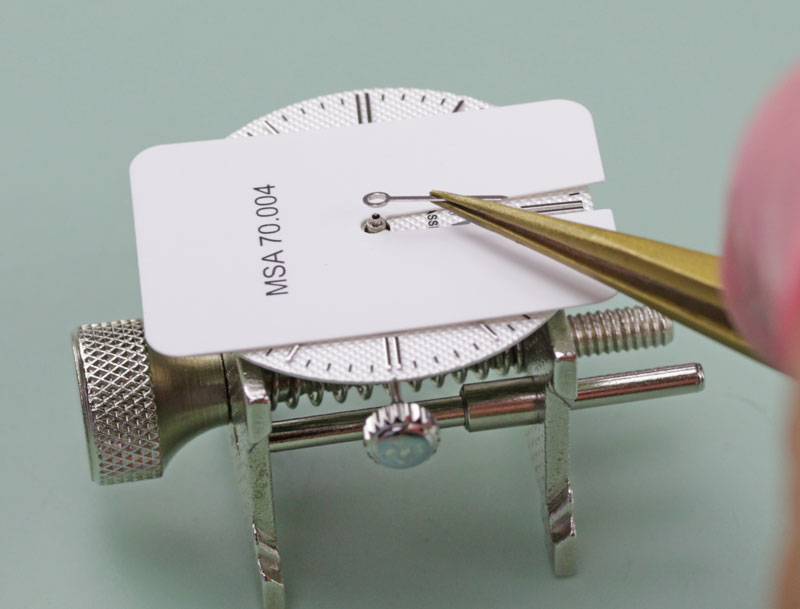 Start by installing the hour hand first (the shortest hand with the largest mounting hole). Pull the crown out to the second click to stop the hands from moving while you are trying to install them. Place a dial protector to prevent scratching; using brass tweezers gently place your hand at the 12 o’clock position to match the date change. We want the date to start rolling over to the next day around midnight.
 With the hour hand in place, use a 1.5mm (grey tip) hand press to press down the hour hand over the post.
 You will repeat this step for the minute hand, aligning it at the 12 o’clock position. Use the 1.00mm (black tip) hand press to press the minute hand.
 Again, using your brass tweezers, place the second hand on the center post. It helps to use a headband magnifier to better see the small post. Use the flat end brass tip of the hand press to push it over the post; make sure to use light pressure so you don’t bend the hands.
 Once all the hands are installed make sure they don’t touch each other and are all parallel with each other and the dial. You can bend the hands slightly with tweezers if they are touching or angled. Be gentle as the tweezers can scratch and bend the hands.
You can check the hands alignment by pulling the crown out and turning a few rotations. Push the crown in and wind for two rotations and watch that the second hand rotates freely around the dial.
Remove the stem and crown assembly from the movement using the set lever and set aside.
Step 8
Place the Movement into the Case
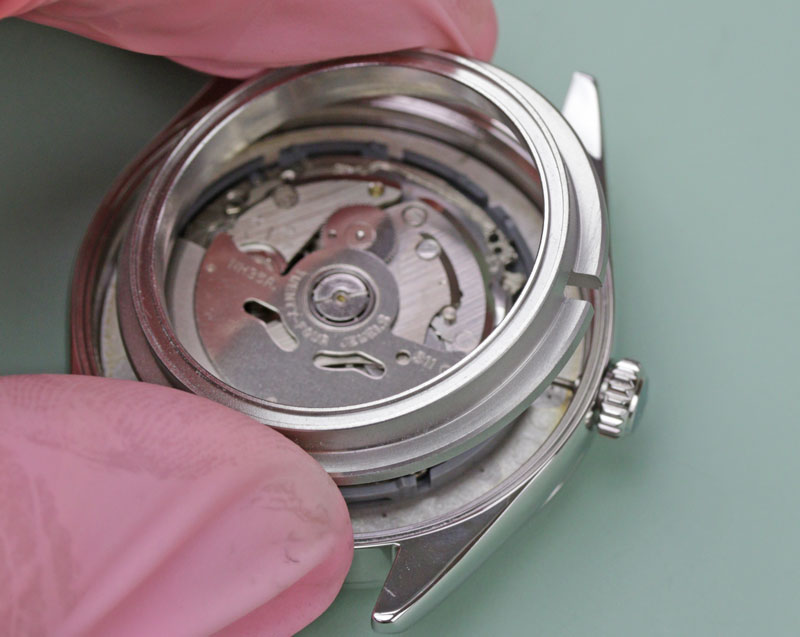
 Place the movement in the movement holder upside down so the dial is face down. Clean the inside of the case with a microfiber cloth and/or dust blower. You want to make sure there are no fingerprints or dust specs inside the case before placing the movement inside. Once the watch is sealed up, you want it to stay clean.
Place the dial and movement into the case with the dial facing the glass. Make sure to line up the date window of the dial with the case tube on the case.
Step 9
Install the Stem and Crown
Put the stem and crown back in the movement for the final time. Press it in until it clicks into place.
Step 10
Place Movement Ring into Case
 Put the movement ring over the movement into the case. The ring has a cutout that must be aligned with the stem and the opening of the cutout must be facing the dial. If you are not careful about aligning the cutout with the stem, you can damage the stem or case tube when installing the movement ring.
Gently press the ring down until it is even with the case on all sides. It should be about the same height as the movement when it is fully in place.
The cutout of the ring fits around the case tube and stem
Step 11
Place Spacer Ring
![]() A white spacer ring is necessary to keep all the parts from moving inside the watch case. Simply place the ring over the movement ring, into the grooves. There is no top or bottom side, as it is a flat ring on all sides.
A white spacer ring is necessary to keep all the parts from moving inside the watch case. Simply place the ring over the movement ring, into the grooves. There is no top or bottom side, as it is a flat ring on all sides.
Step 12
Put the Gasket on the Watch Back
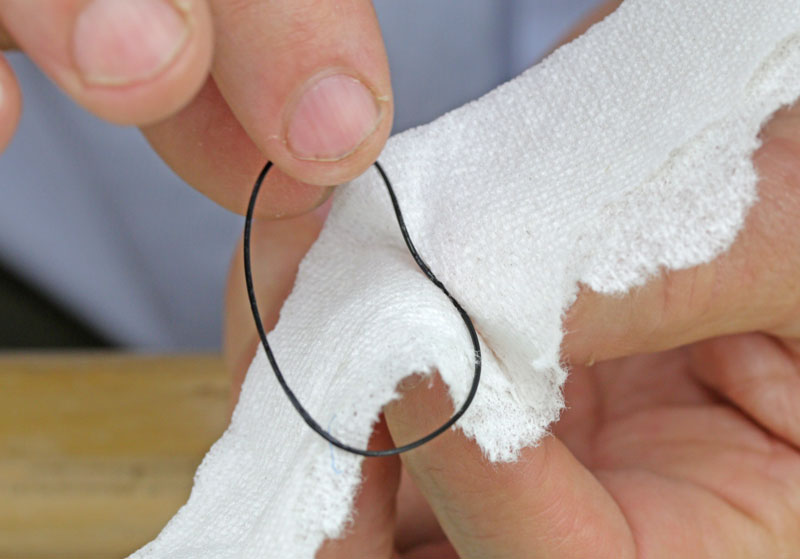 Lubricate the case back gasket with silicone grease. When lubricated in silicone grease, the gasket will last much longer and be much less likely to leak, keeping your watch movement moisture free. It also insures that the gasket will not be damaged when the back of the watch is screwed off and on for repairs or upgrades. Do not use excessive grease, only a light layer is needed. Do not grease the case or back or other components.
An easy way to apply the grease is to put a small amount of grease on a paper towel. Use the paper towel to grip the gasket and pull the whole length of the gasket through the grease.
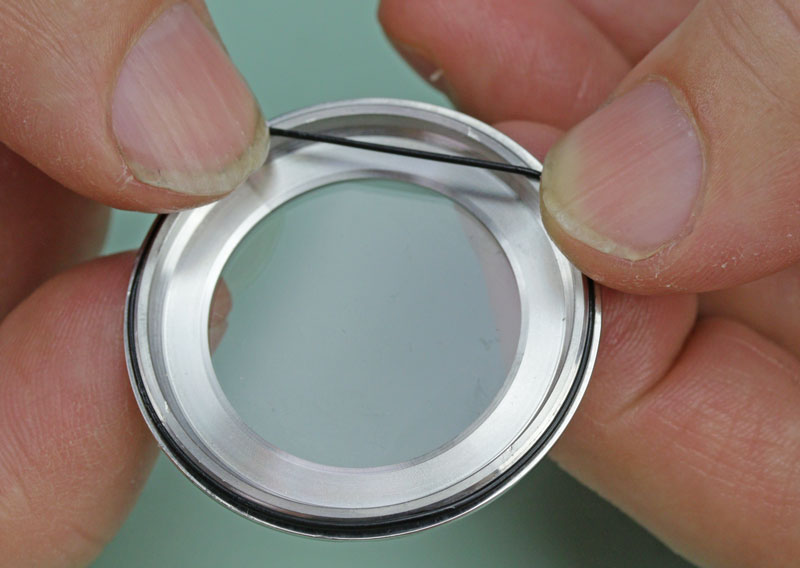 Slip the gasket over the side of the case back lip, hold it in place with your thumb. Then, using your index finger and thumb of your other hand, stretch the gasket slightly to slip it around the rest of the case back and fit into place.
Click here to learn more about replacing a watch back gasket
Step 13
Screw Case Back On
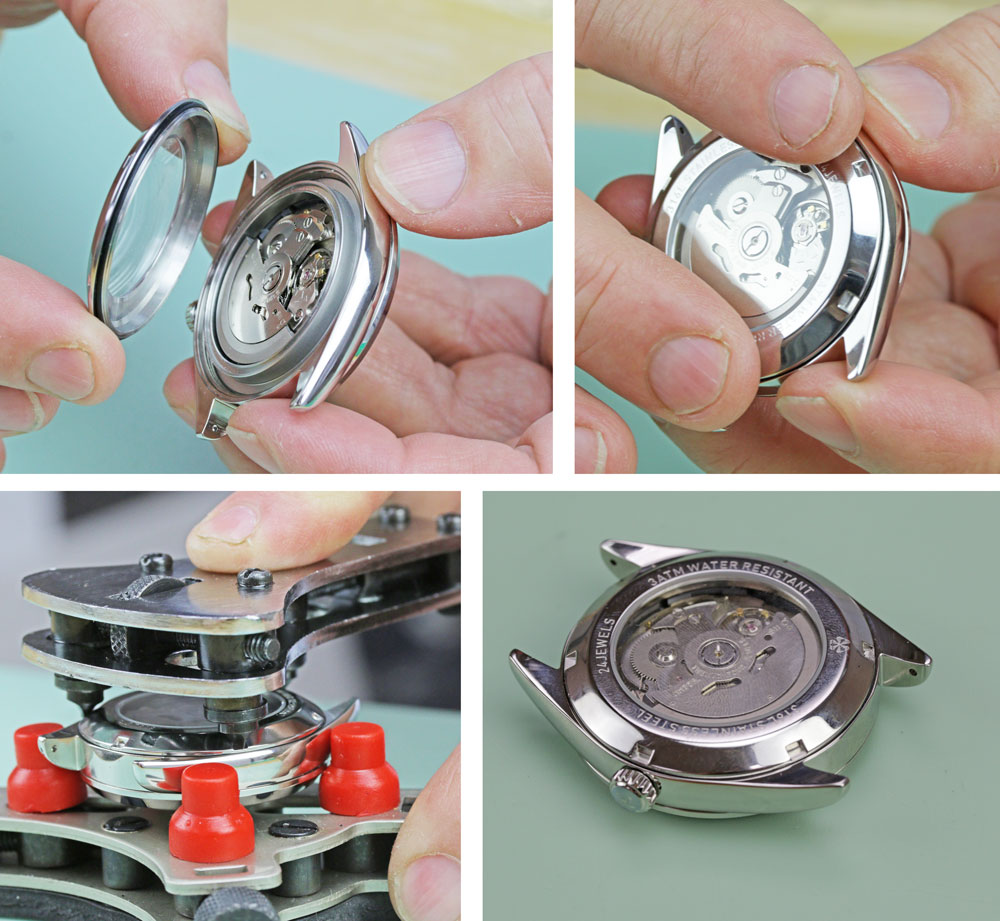 With the gasket lubricated, the back is now ready to be put on the watch. Place the watch into a watch case holder and put the back onto the case and tighten it. Hand tighten as far as possible, then use a JAXA wrench or other closing tool to turn a 1/4 to 1/2 turn to make it tight. You don’t want to over tighten or it will be a much harder job getting the back off when a repair becomes necessary.
Click here to learn more about using a jaxa wrench to screw down a watch back.
Step 14
Attach the Watch Band
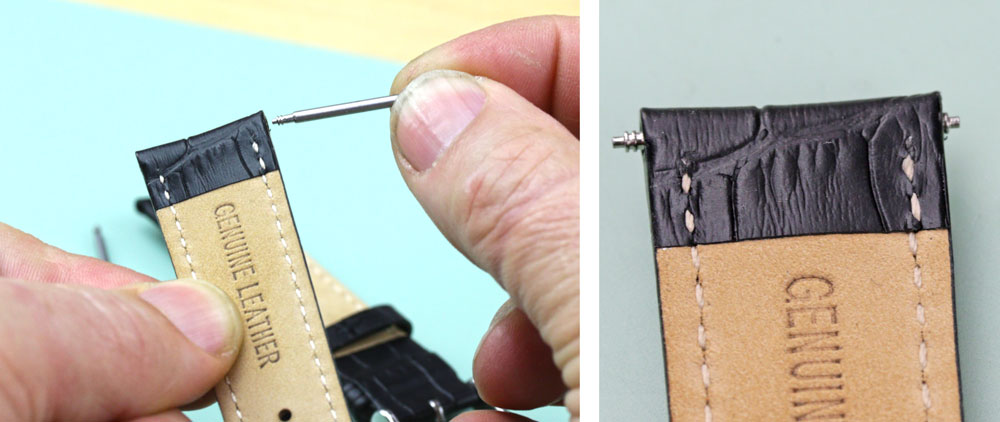 Insert your spring bars into the holes at the ends of the watch band all the way through.
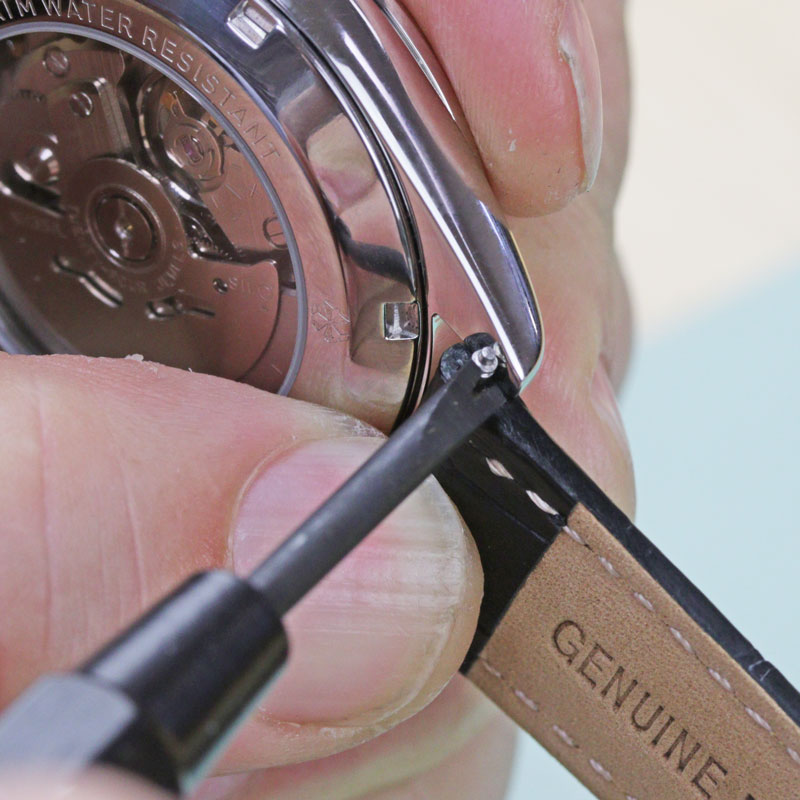
 Holding your watch with the watch back facing you and the crown pointing to the ceiling, place the end of the spring bar from the band half with the buckle into the hole on the bottom lug. Be sure that your watch band’s finished side is facing the same direction as the watch face. Take the forked end of a spring bar tool and push down on the spring bar to compress it. You can use the spring bar tool to slide the spring bar under the lug and find the hole. Move the watch band around in the lugs until you feel and see the spring bars pop into place.
 Turn the watch case around and repeat with the other half of the watch band.
Click here to learn more about how to replace a leather watch band
Step 15
Set the Time
 Now that your watch is completely built and ready to wear, you need to set the time.
If you want to further customize and personalize your watch by swapping the band or the hands or adding a date magnifier, check out this article for ways to upgrade your watch.
Step 16
Set the time
 The time is set by using the crown at the 3 o’clock position. It has two setting positions, first click and second click. To change the date pull crown out to position 2 and turn clockwise until the desired date is reached. Pull the crown out to position 3 to set the minute and hour time. This will rotate both backward and forward to set the time.
After setting the time be sure to push the crown all the way back to position 1 to seal the watch from dust and moisture.
The mechanical movement in this watch is automatic and doesn’t have or need a battery. By wearing the watch, your movements throughout the day keep the watch wound and running normally. If you don’t wear the watch everyday, winding it manually can keep it running. Wind the watch manually with the crown; while it is fully pressed in, rotate 20-30 times in both directions. When you’ve wound it enough to get the watch running, wear the watch and the auto winding mechanism will continue to wind it for you.
God bless u guys!!!!
I want to assemble my own custom watch, with parts I got from different retailers. I am so excited to start working on it and I hope this guide will do a great job in helping me to assemble my first watch. Unfortunately I am not using the kit because I cannot afford it. I am so excited for my new hobby; making custom watches. 🙂
Hi I Need Help, I have quart pocket watch, needs to replace the movement, I have remove the back, and the stem and crown but am unable to remove the movement through the back of the watch case I need Help. Thanks
That’s because most pocket watches the movement comes out from the front you’re going to have to remove the front bezel I think
I think it’s time you guys did an instructional video on this – MAKE MY OWN WATCH CLASSIC 40 INSTRUCTIONS. content is from 2018 – time for an update!