
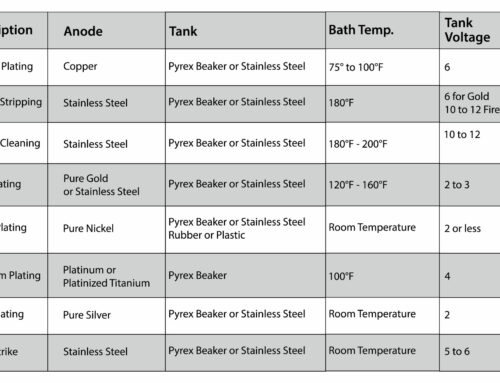
Advantages of The Studex Universal System
- The Studex instrument has a built-in mechanism to easily release the stud adapter from the plunger. In addition, a set of color-coded Adapter Clips are included with the kit that ease installation and removal of adapters. See loading instructions for details.
- The handle of the Studex instrument is contoured for a comfortable, balanced grip for maximum control. The instrument is designed to allow the technician to maintain better alignment with the ear for a more accurate piercing.
- In the cocked position, the pointed tip of the piercing stud sits closer to the ear than with other instruments. This allows the technician to more precisely position the stud for a more accurate piercing.
- Adapters are color-coded to differentiate between sizes.
- The backing nuts (clasps) are located on the plastic mount under each piercing stud for easier insertion into the clasp retainer.
Stud and Instrument Component Names

EAR PIERCING INSTRUCTIONS
Preparation for Piercing
A. Preparing the Customer
- Have the customer select the style of piercing stud they would like from the Studex Ear Piercing Selection display board.
- Have the customer select the style of piercing stud they would like from the Studex Ear Piercing Selection display board.
- Have the customer sit in the designated piercing area.
B. Preparing Yourself for the Ear Piercing
First, familiarize yourself with the piercing instrument and the packaged studs (see Figures 1 and 2). It is very important that you present yourself as a confident, expert ear piercer to the customer. The more comfortable you are, the more at ease your customer will be. This will help the customer relax and relieve any anxiety they might be experiencing.
- Thoroughly clean both hands. Put disposable gloves on both hands BEFORE proceeding with the ear piercing.
- Check customer’s ears for cysts. When you pinch the ear and feel a small, hard lump that can be moved, it is probably a cyst. If you can see and feel a lump that doesn’t move, it is most likely scar tissue (cysts are not visible and do not move). You may pierce through scar tissue, but never through a cyst, as it may rupture, releasing debris into the surrounding tissue, which can cause an infection.
C. Marking the Ears Have the customer take off any earrings they are wearing.
- Cleanse the customer’s ears with Sterile Prep Pad or cotton ball with alcohol and let dry.
- Ask the customer where they would like the piercing to be and mark the ears accordingly with the non-toxic Marking Pen (See Below).
- Have the customer check and approve the marks BEFORE proceeding with the piercing. The customer should not touch their ears after cleansing.

Replacing an Existing Adapter without using the Studex Adapter Clip
- When you first receive your instrument, the Regular adapter is already in the plunger of the instrument. If you are piercing with either a Mini or Large stud, you must remove the Regular adapter and install the proper adapter for the studs you are using. The Mini and Large adapters are stored in the handle of the instrument.
- Hold the trigger in and pull the plunger all the way back past the cocked position, until the plunger cannot be pulled any farther. The adapter will dislodge itself from the plunger enough to be easily removed.
- Select the proper adapter for the studs you will use to do the piercing. The adapters are color coded for ease of identification:

- With the plunger in the cocked position, press the desired adapter into the front of the plunger as far as it will go.
- Once the adapter is properly seated in the plunger, pull the trigger to return the plunger to the uncocked position (Figure 4).


Replacing the Stud Adapter Using the Studex Adapter Clip
Please read these instructions carefully before using the Adapter Clip to remove or install the stud adapter in order to prevent damage to the adapter, the clip or the instrument.
Removing the Stud Adapter
- Make sure the instrument is uncocked.
- Place the empty Adapter Clip over the plunger as shown in Figure 5-1.
- Pull the plunger knob back firmly (Fig. 5-2). The stud adapter will snap out of the plunger shaft automatically.
- Lift the Adapter Clip off the instrument. The stud adapter will remain in the Adapter Clip (Fig. 5-3).
Installing the Stud Adapter
- Cock the instrument.
- Snap the proper stud adapter into the Adapter Clip (Fig. 5-4).
- Place the Adapter Clip (with the stud adapter in it) over the plunger (Fig.5-5).
- While holding the plunger knob firmly to keep the plunger from snapping forward, pull the trigger to release the plunger, and gently slide the plunger to the fully forward position (Fig 5-6).
DO NOT simply pull the trigger and ‘fire’ the plunger, as damage to the adapter, clip or the instrument could result as the plunger snaps
forward. - Once the plunger shaft is fully forward, lift off the Adapter Clip (Fig. 5-7)
- Cock the instrument and press the stud adapter firmly to make sure it is fully seated in the shaft (Fig 5-8). The stud adapter will ‘click’ when it is properly seated.

Cleaning the Instrument
- Before and after each piercing, thoroughly cleanse the entire area of the clasp retainer (see Fig. 6) by wiping with a cotton ball or swab moistened with alcohol.
Loading the Instrument
- Cock the instrument by drawing the plunger back until it locks into place.
- Grasp blister backing paper and peel away to expose the sterilized rigid plastic mount that holds the studs and clasps. BE SURE NOT TO TOUCH THE STUDS once the package is opened or the sterilization will be lost (Figures 6-1 & 6-2).
- Being careful not to touch the studs, flip the plastic mount up with the index finger enough to grasp the sides of the mount with the thumb and middle finger (Figures 7-1 & 7-2). Lift the mount out of the sterile container. The studs should be at the bottom of the mount and the clasps at the top of the mount (Figure 7-3).
- Insert one stud head into the stud adapter and pull the mount straight up to release the stud from the mount (Figure 8).
- While keeping the instrument in the upright position, slide the corresponding clasp (located directly above the stud) into the clasp retainer at the end of the instrument (Figure 9).

Performing the Piercing
- Place the ear between the clasp retainer and the stud, carefully aligning the point of the stud with the mark on the ear. While maintaining proper alignment, slowly
squeeze the trigger until the ear is held securely by the instrument (Figure 10). - Keeping the proper alignment, continue to squeeze the trigger until it releases the plunger. In less than 1/10 of a second, the ear will be pierced and the clasp
will be automatically installed on the stud with the proper spacing (Figure 11). - Release the trigger and carefully pull the instrument straight down from the ear (Figure 12).
- Repeat this procedure for additional ear piercings.
- Give the customer the signed after-piercing care instructions to take home with them.
If you are piercing in the cartilage area of the ear (see Fig. 13), special care must be taken during both the piercing and the after-piercing care.
When piercing the cartilage around the edge of the ear, with customers who have very thick or heavily curled cartilage, you must pull the cartilage
slightly to “unroll” it. This is to ensure that the piercing instrument can be properly positioned.
Whenever piercing through the cartilage area of the ear, you must take care to ensure the instrument is held perpendicular to the surface of the ear.
Alert your client that the healing of the cartilage area will take somewhat longer than the lobe area.

AFTER PIERCING CARE
After piercing care is the most important factor
in keeping pierced ears healthy.
STUDEX Ear Care Solution and STUDEX Ear Care Gel are formulated with the single purpose of maintaining healthy pierced ears.
STUDEX Ear Care Solution is specially formulated and pH balanced to keep the skin soft and healthy. STUDEX Ear Care Gel is the same basic formulation in a convenient gel form. Utilizing benzalkonium chloride, both Ear Care Solution and Ear Care Gel are effective against staph and strep germs. The nonburning formulation makes it safe and pleasant for all ages.
Training (piercing) studs should not be removed for 4 to 6 weeks. Clasps should not be too tight against lobe.
STUDEX Ear Care Solution or Gel should be used at least twice a day during the first 6 week healing process. Without removing the earrings, liberally apply Ear Care Solution or Gel to the front and back of each ear using a saturated cotton ball or tipped applicator. Gently slide studs back and forth in the ear to work the gel or solution into the pierced hole. Rotate ear studs (like winding a watch) two or three times a day.
Use Ear Care Gel before showering to keep hairspray, soap, shampoo and other hair preparations away from the ear. After showering or shampooing, the ears should be thoroughly rinsed and then cleansed with Ear Care Solution and Ear Care Gel should be re-applied.
Ear Care Solution or Gel should then be used daily thereafter to help reduce the incidence of infection. Even after the ears have healed and the customer is wearing other earrings, Ear Care Solution should be used regularly to keep ears healthy and earrings clean. Complete instructions for using Ear Care Gel and Ear Care Solution are on their containers and packaging.
Cleanliness is one of the most important points to keep healthy our ear to clean the ear pavilion, what we do with a wet tissue and towel.
Jones@Personalsoundamplificationproducts
do you have any recomandations about what earrings to use for the piercing gun
I like your blog share, It’s helpful.
These are amazing ear piercing ideas
Clear instructions on ear piercing aftercare really help prevent issues like infections or irritation. Keeping piercings clean and rotating the studs daily supports faster healing. Thank you for sharing.
Hi everyone
l had my both ears pierced with a gun when l was about 5 year old
all went fine
2 months to be fully healled
& a year to get my holes permanantly sat up
even not heurting
no alergy
no infection
that was a nice gift to play with