
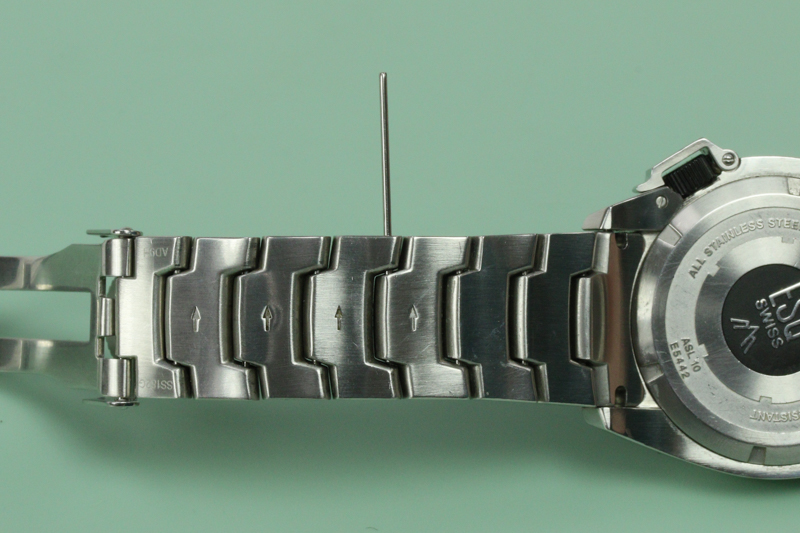
If your metal watch band is too small, you can add links to make it bigger and ensure a perfect fit. Use this guide to add links that are held in place with pin and sleeves. How do you know if your watch band uses pin and sleeve pins to keep the links together? Look at the pins and if there is no specific marking to show which way the pin should be removed and you can see a small metal ring around each end of the pin within the link you probably have a pin and sleeve style link. You may need an eye loupe to see the ring around the pin.
Tools Needed:
- A jeweler’s small ball-peen hammer
- A pin pusher
- A watch band holder
- A parts tray
- A non-magnetic tweezers
- A digital gauge
- A jeweler’s thin nose pliers
- Extra links with pins
- And replacement sleeves
Step 1
If you have previously removed links from your watch band, find the extra links and pins that you removed. You can use them to add links to your band without having to purchase new parts or links. If you don’t have extra links, you will need to order additional links.
Step 2
Choose which side of the watch band you want to start removing links from and position the watch band in the holder to keep it steady. Make sure that the hole of the link you want to remove is positioned over a hole in the band holder.
Step 3
Take your pin pushers and find the pusher that will fit on the head of the link pin without touching the sleeve ring around the outside of the link. Center the point of the pin pusher over the link pin in the watch band. Holding the pusher steady, take your small ball peen hammer and begin to tap on the end of the pin pusher with the flat head side.
You will need to use some force to remove this pin, start gently and slowly increase the force until the pin starts to move – over doing it could damage the watch band.
Step 4
When you cannot push the pin pusher any further into the band, set it aside and remove the watch band from the holder. At this point, you will need to take the jeweler’s pliers and use it to grip and pull the pin out. Put the pin aside in your parts tray. The band should now have an opening between two links.
Step 5
Set the watch band back in the holder so that the end with the two sleeves still inside it is accessible. Using the pin pusher again, position the tip inside the link hole against the silver ring of the pin sleeve. Pound the friction sleeve out of the hole with your ball peen hammer. Be careful not to use too much force and damage the watch band.
When the first sleeve falls free you can set it aside in your parts tray and turn the watch band over to remove the second sleeve from the link. Line up the pin pusher with the thin edge of the sleeve and begin tapping on the pusher with the flat head of your ball peen hammer. Continue applying pressure to the sleeve until it falls out of the link. Set it in your parts tray. Remove the band from the holder and let it fall open.
Step 6
Take one link from your collection of extra links and check the loose link for sleeves. If your loose link does have sleeves in the ends already, you will need to remove them before continuing. Repeat step 5 to remove any remaining sleeves from the loose link.
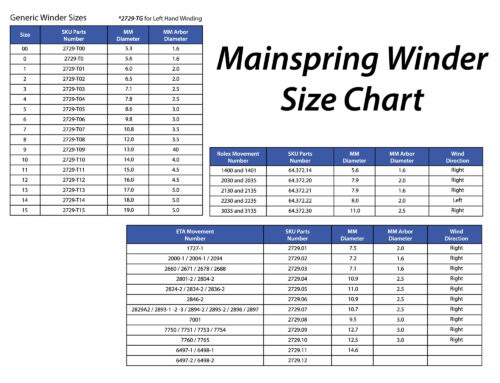
Before continuing, you will need to order new sleeves. Take one of the pins that you removed from the watch band and measure its width with your digital gauge. Once you have the width of the pin, you can find the correct size replacement sleeves for the band.
Step 7
With the replacement sleeves on hand, line up a loose link with a loose end of the band. Take one of the pins from your parts tray and slide it into the hole in the link. Hold the pin in place in the links while you put the watch band in the band holder. This time, be sure to line up the hole in the link with a solid section of the watch holder to keep the pin in place.
Step 8
Then grab one of the new sleeves with your non-magnetic tweezers and place it over the hole in the link with the loose pin. Next, use the flat head of your ball peen hammer to start gently tapping on the sleeve until it is pushed enough into the link that it won’t roll away. Once it is held steady, you can use more pressure to tap the sleeve into place. As the sleeve slips further into the link and your hammer gets closer to the watch band, take your pin pusher again to add some distance between your hammer and the watch band. Make sure you move the pin pusher around so the sleeve continues to go evenly into the link.
Step 9
When the first sleeve is flush against the band, remove the band from the holder and turn it over and replace it in the holder. Now, place the second sleeve on this end of the link and pound it into place like you did with the first one. Remember to use the pin pusher to add distance between the hammer and the watch band as the sleeve is pushed into place. Stop when the sleeve is flush with the watch link.
Step 10
Take the band out of the holder and wrap it around your wrist to see how it is fitting. Be sure that the metal clasp is closed, and then judge the distance of the opening in the band. If the gap is larger than one link, you will need to add at least two more links to the band. Remember you can add two links to this side of the watch band before you need to add a link to the other side.
Add another link to this side if you need to.
Step 11
Once the loose links have been added to the band, there should only be one opening in the band. Line up the two loose ends of the band and connect them by sliding one of your loose pins into place between them. Keep the pin in place with your fingers while you put the watch band in the band holder. Remember to line the hole in the link up with a solid section of the watch holder to keep the pin in place.
Step 12
Then grab another new sleeve with your non-magnetic tweezers and place it over the hole in the link with the loose pin. Gently tap the sleeve into place with use the flat head of your ball peen hammer. When the pin is in place enough to be held steady, you can use more pressure to tap the sleeve into place. As the sleeve slips further into the link and your hammer gets closer to the watch band, take your pin pusher again to add some distance between your hammer and the watch band.
After the first sleeve is flush with the band, remove the band from the holder and turn it over. Place the band back in the holder and position the second sleeve on this end of the link pin with your tweezers. Pound the sleeve into place like you did with the first one. Remember to use the pin pusher to add distance between the hammer and the watch band as the sleeve is pushed into place.
Step 13
When the sleeve is flush with the watch band, you can remove the band from the holder and try it on again. If you can comfortably close the clasp on your wrist, you are done.
If you still cannot close the clasp you will need to add another link to the band, on the opposite side from the one you started on.
Step 14
If you need to add more links, take the band off and turn it around so you can add the rest of the links to the other side. Repeat steps 3 through 12 to add any additional links and close the watch band again.
Finished
When the band is together again, try on the watch band. It should fit just the way you like. If not, you can add or remove additional links until it does. To learn how to remove links, check out the article to learn How to Remove Pin and Double Sleeve Style Band Links.

Leave A Comment