Sometimes your watch band clasp will wear out before your watch band does. If you don’t want to replace your whole watch band you can always just replace the clasp itself. Use this guide to learn how to change tri-fold style watch band clasps with buttons.
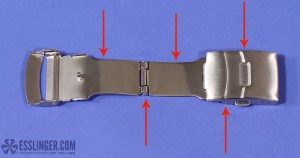
How will you recognize a tri-fold clasp with buttons? When the clasp is open three metal plates and two joints, when it is closed the two lower plates will fold under the out clasp that matches the watch band style. The cover portion of the clasp will have two spring loaded metal protrusions that when pressed, release the clasp’s mechanism to open it.
Tools Needed:
- A spring bar tool
- A pin punch
- A jeweler’s ball peen hammer
- A watch band holder
- A digital gauge
- A parts tray
- An extra friction pin
- An extra spring bar
- A replacement tri-fold clasp with buttons
Step 1
The first thing to do will be to remove the old clasp so you can replace it and continue wearing your watch. Start by opening the watch band clasp and inserting it into your watch band holder so that the hole bottom layer of the clasp where it attaches to the watch band is aligned with a hole in the holder.
 Step 2
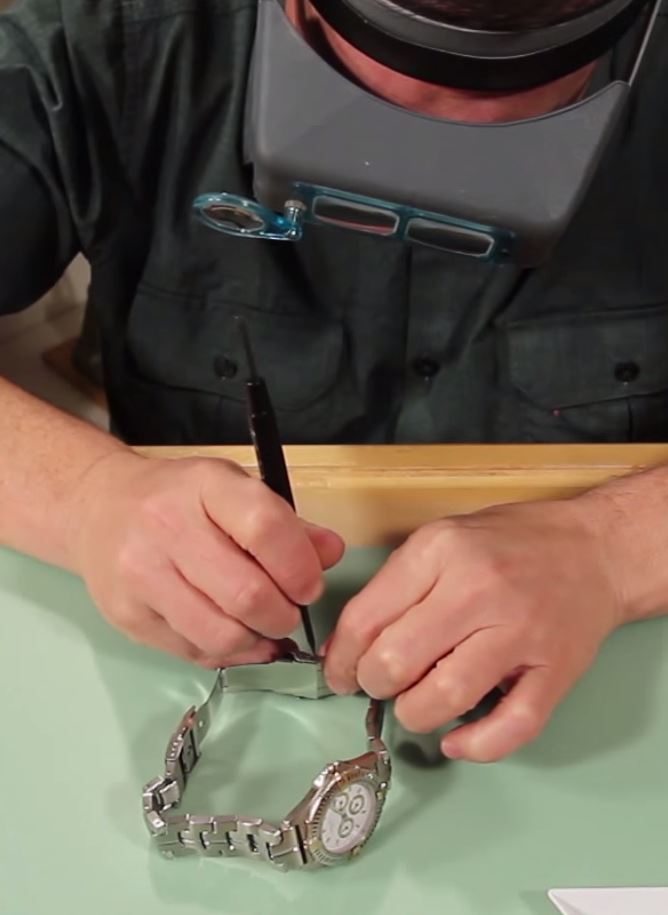
Take your pin punches and find the one that fits inside the hole of the friction pin that holds the watch clasp to the first end of the watch band. Once you have the pin punch that fits your watch band, position the punch over the friction pin hole and gently tap on the punch with your ball peen hammer to remove the pin. Gradually increase the pressure you apply with the hammer until the pin punch is steadily pushing the pin out of band. When you can’t push the pin punch any further into the watch band, set the punch and your hammer aside and remove the watch band from the holder. If the pin does not fall out of the watch band, grab it with your fingers and pull it out then set it aside in your parts tray.
Let the first end of the old clasp fall free of the watch band. It should be the ‘forked’ end of the clasp with a gap between the two tube ends of the clasp like this. Remember which side of the watch band the forked end attached to so you can be sure that you place the new clasp correctly later.
 Step 3
Next, position the watch band on your work surface so that the second end of the watch band clasp is in front of you, with the back of the watch band facing you. You should be able to see where the clasp overlaps the watch band and the tips of the spring bar that keep the band and clasp together at the outside of the watch band here.
Take your spring bar tool and, using the pointed end, insert the end into the hole in the watch band clasp where you noticed the spring bar. Push down on the spring bar to compress it, and then angle your spring bar tool to slide the watch band and compressed spring bar out from under the clasp. As the spring bar emerges from under the watch clasp, it may spring open again and fly across the room if you are not careful. Be sure to work carefully so you can keep the spring bar from escaping and place it in your parts tray to use later. Let the watch band fall apart and set the old clasp aside.
Step 4
Then, use the old clasp to measure for the dimensions of the new clasp. Start by measuring the outside of the forked end of the clasp with your digital gauge. With that measurement in hand, you’ll measure the inside of the cover part of the clasp that fits over the watch band. Use the backward opening jaws of the gauge to find this measurement. It should be about one millimeter larger than you first measurement.
Order the right size and color replacement watch band clasp, once you have these numbers in hand. Be sure that your replacement has buttons too to ensure you have a secure clasping mechanism.
 Step 5
When you have the new clasp in hand, you will want to start by attaching the cover end of the clasp to the watch band first. Take your spring bar and insert it back into the end that you removed it from earlier. Holding the watch band and the spring bar together, slip the watch band inside the watch clasp so that the outside of the watch band faces the inside of the watch clasp cover.
Align the end of the spring bar with the hole in the bottom of the clasp. Take your spring bar tool now and use the forked end to press the spring bar down into the watch band so you can slide it completely into the watch clasp end. Carefully remove your spring bar tool and wiggle the watch band around under the clasp until the spring bar slips into place in the hole in the clasp and expands again.
 Step 6
With the watch clasp partially attached to the watch band, you can now attach the other end of the clasp to the band. Take the two loose ends and hold them together so the forked end hugs the loose end of the band like this. Start to insert your friction pin into the clasp and band to hold them together and then place both parts into your watch band holder to keep them steady while you replace the friction pin.
Make sure that the pin hole is not lined up with a hole in the holder so you don’t accidently push it out of the band again. Tap gently on the end of the pin with your ball peen hammer to start to replace it in your watch band. As the pin slides further into the band, be sure to take your pin punch and put it between the pin and hammer to push it the rest of the way into place so you don’t hammer on the watch band itself and damage it.
Finished
Once the pin is flush with the watch band again, you can remove the watch band from the holder and continue wearing your watch again. To learn more about watch band repair, check out the rest of our Learning Center.


Leave A Comment