When changing a watch battery, the actual act is fairly simple, but there are many things you need to be aware of beforehand to keep from damaging the watch movement. If you open your watch case and encounter a movement cover with one or more springs sticking up out of the cover, you can be sure that this kind of watch will require some special attention to change the battery. To change rechargeable battery in a watch with many functions, you should follow these instructions.
Disclaimer: This article is designed to help you replace a CTL1616 rechargeable watch battery in three specific movement options – the Casio 2608, 2638, and 2688. These steps might not reflect the steps you would need to take to replace rechargeable batteries in watches with other movements or watches made by other companies. These directions can not be applied to all watches, and if you are unsure of what you are doing, leave this work to professional watchmakers.
Tools Needed:
- A Flat Head Watchmaker’s Screwdriver
- A Screwdriver Block for Removing Double Ended Screws
- A Watch Parts Tray
- Non-Magnetic Tweezers
- Plastic Tweezers
- Finger Cots
- CTL1616 OR other rechargeable cell
Step 1
Before even thinking about opening a watch case that is powered by a rechargeable battery to change the battery, you should always leave the watch out in the sunlight to make sure the battery is actually dead and doesn’t just need to be charged. For optimal charging times and instructions, check your watch’s user manual. If you no longer have the manual, you can find watch model recharging information by searching the model number online.
Be sure to check the crystal of the watch as well: if the crystal is very dirty or heavily scratched and chipped, your battery might not be able to charge due to the solar panel in the watch face might not be getting enough light.
Step 2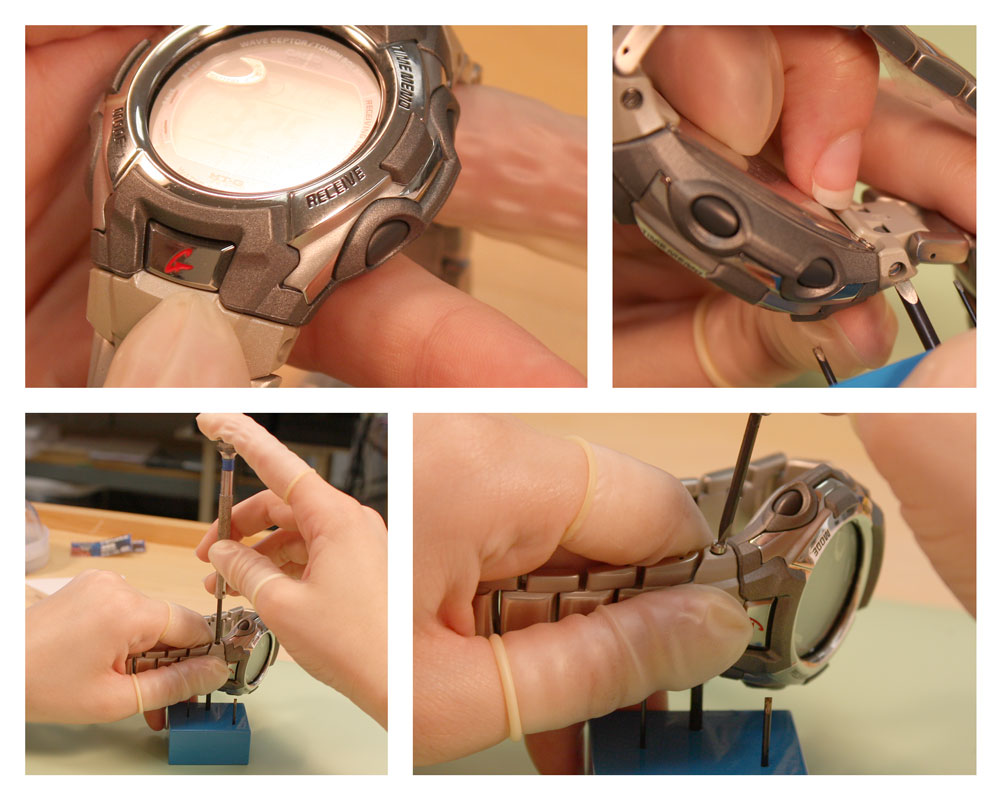
Then since the Casio G-Shock model we have today has a particularly tricky design, we’ll walk you through opening the back here as well. To remove the back, you must first remove the watch band to access the back and avoid damaging the gasket. Start by removing the band on the side of the watch case that has the red “G” button.
Line the screw head on the right side of the G button (the side with the Time Memo and Receive buttons) with the largest screwdriver blade on your screwdriver block. Stand the watch case up on the block holding it so you can insert your free flat head screwdriver into the screw head facing up. Using the block to hold the bottom screw head steady, unscrew the upper screw turning it counterclockwise.
Step 3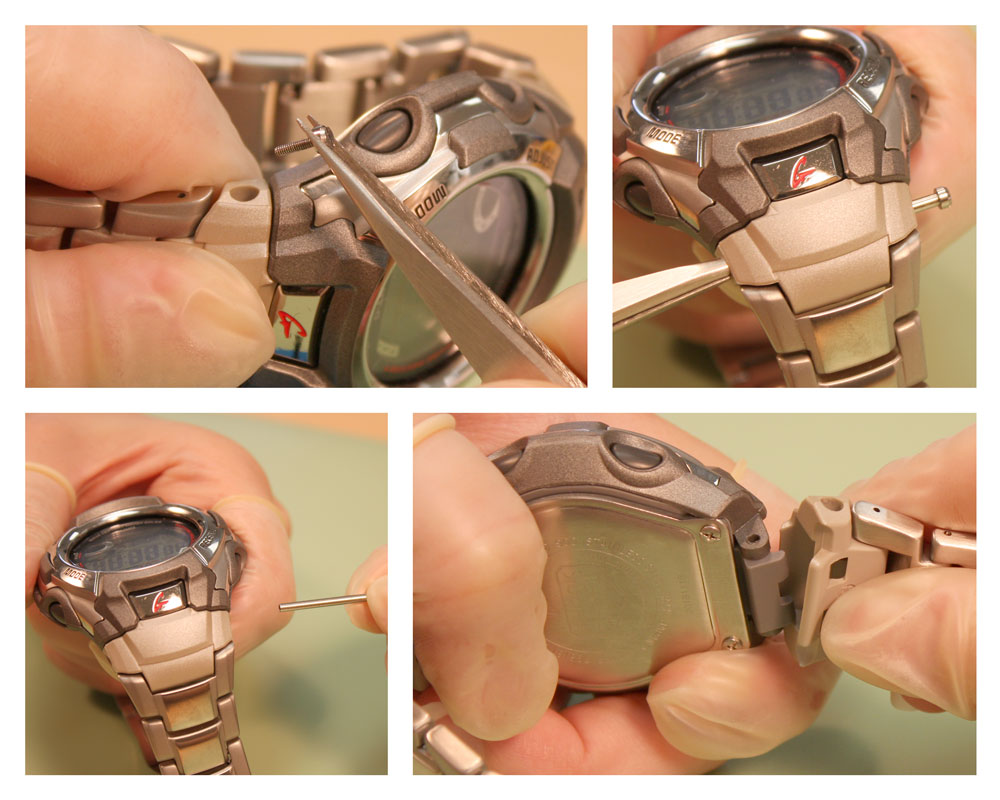
Remove the screw from the band when it comes loose and take your non-magnetic tweezers and use them to push the tube attached to the other screw head out of the band. Place both the screw head and the tube in your parts tray so they don’t get lost during the repair. When nothing else is holding the band to the watch case, pull the rubber end cap attached to the watch case away from the watch band until the end cap slips off the watch case.
Step 4
Turn the watch case over, so the other side of the watch band is accessible. You should always completely remove the watch band to avoid damaging the watch case back or gasket. Line the screw head on the right side of the G-Shock label (the side with the Time Memo and Receive buttons) with the largest screwdriver blade on your screwdriver block. Stand the watch case up on the block holding it so you can insert your free flat head screwdriver into the screw head facing up. Using the block to hold the bottom screw head steady, unscrew the upper screw turning it counterclockwise.
Step 5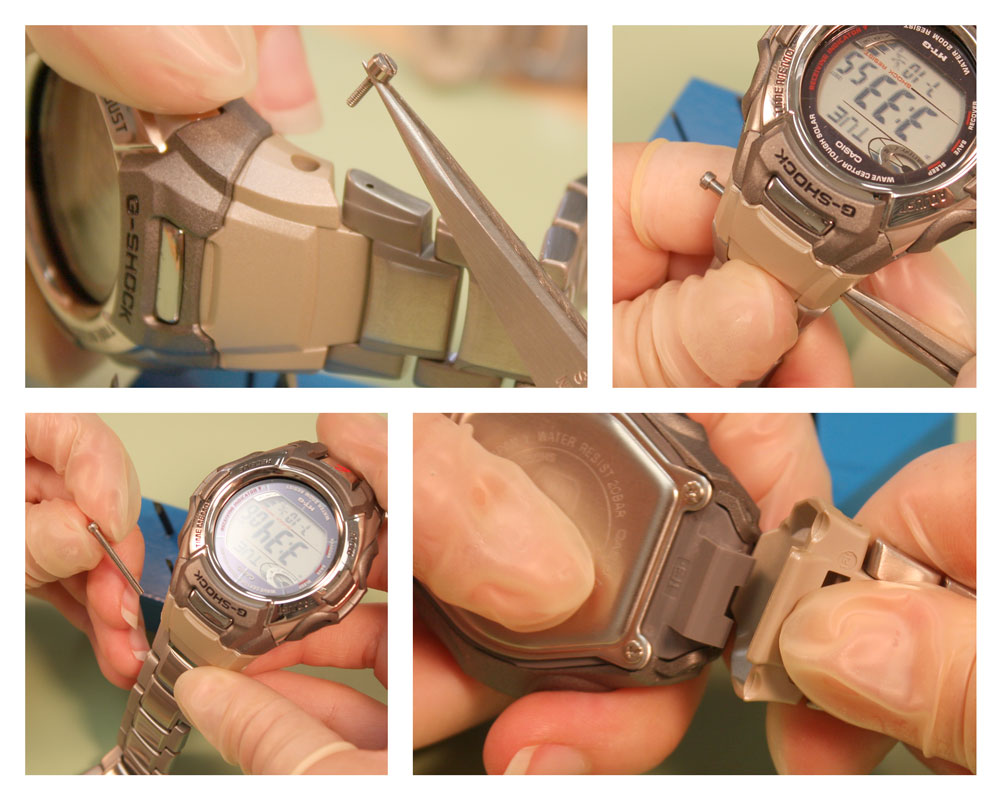
Remove the screw from the band when it comes loose and take your non-magnetic tweezers and use them to push the tube attached to the other screw head out of the band. Place both the screw head and the tube in your parts tray so they don’t get lost during the repair. When nothing else is holding the band to the watch case, pull the rubber end cap attached to the watch case away from the watch band until the end cap slips off the watch case.
When the watch band is completely free of the watch case, set it aside so you will remember which way the watch band attached to the watch case so your clasp lays the right way.
Step 6
Before you remove the back of the watch case, you should put plastic finger cots on your fingers that might touch the watch movement. We recommend doing this because any dirt, oils or grease on your fingers can get on the movement and damage the inner workings of the watch if you touch it with your bare fingers. These finger cots will keep that oil from transferring to the watch.

Step 7
Now you can open the watch case back. To learn How to Open a Watch Case Back with Screws, check out this article.
Step 8
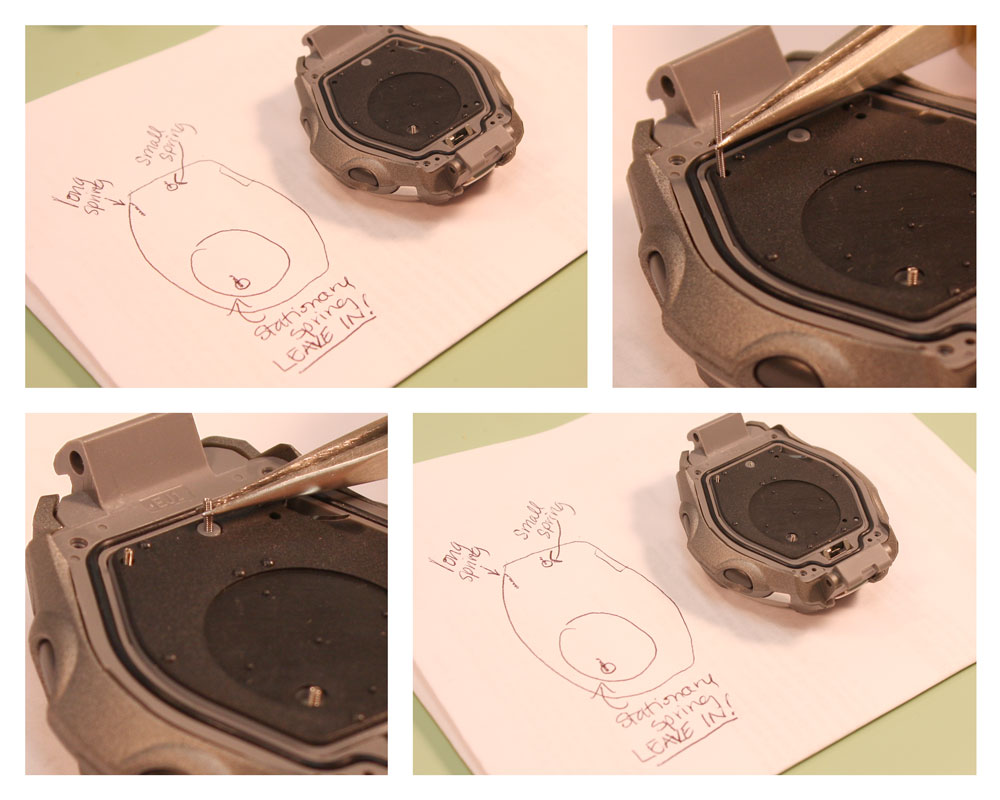
Once the screws have been removed and your finger cots are in place, very carefully remove the case back taking special care not to disturb the springs that are in the watch movement. Once the watch back has been removed, you will see that there are three springs of different sizes sticking out of the watch movement. Before you disturb them, take a picture or draw a diagram of the movement so you can put them back where they belong. Without these springs in their positions, your watch will not function.

Step 10
Now the black rubber cover designed for shock absorption should be sitting in the watch case with nothing else obstructing it now. Remove the black cover and set it aside so you remember where it goes in the watch case. Under the black cover, you will see a white plastic cover. Remove this as well and set it aside, next to the black cover.

Step 11
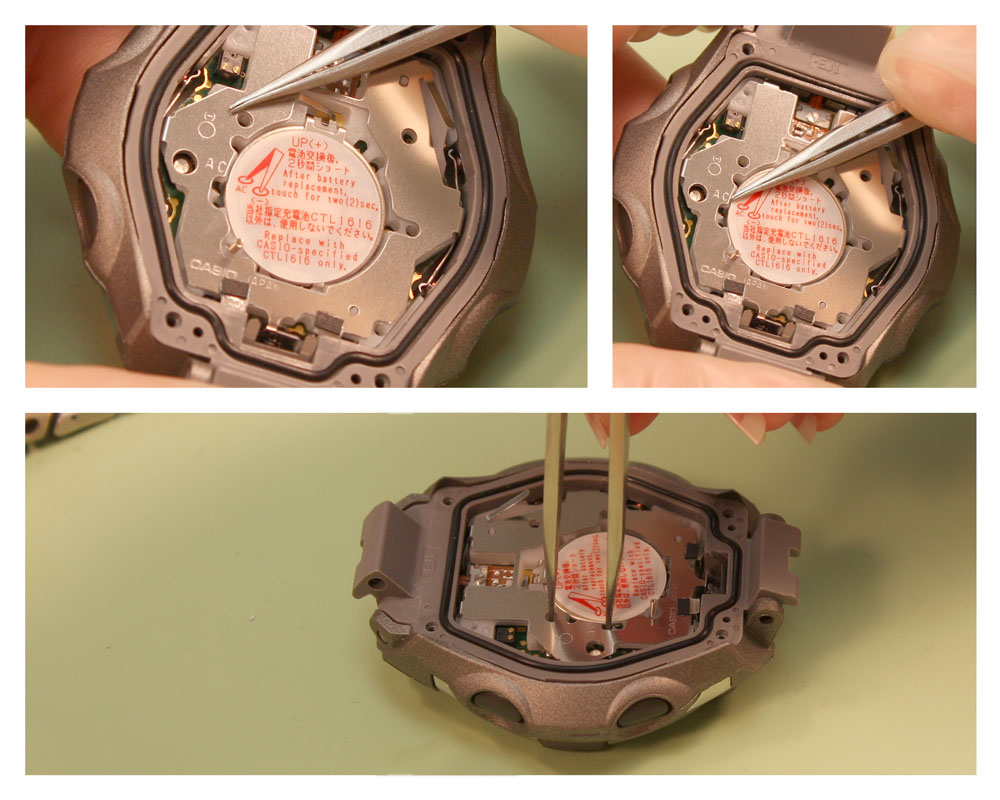
The battery compartment should now be exposed in your watch. The battery will be held in place with a strap that covers most of the battery. Find where the strap latch locks into place. There will be a small opening in the piece that holds the latch down, take your non-magnetic tweezers and grip the metal latch piece in the opening – you may need an eye loupe magnifier to see this latch. Then, carefully push the latch down with your tweezers before pulling the latch out toward you to release the watch strap.
Step 12
When the latch strap is open, take your plastic tweezers and grip the battery to remove it. You may need your non magnetic tweezers to pop the battery out of its slot before you can grab it completely with your plastic tweezers. Set the old battery aside until the replacement is complete in case you need it for something – it should be a CTL1616 rechargeable cell.
Step 13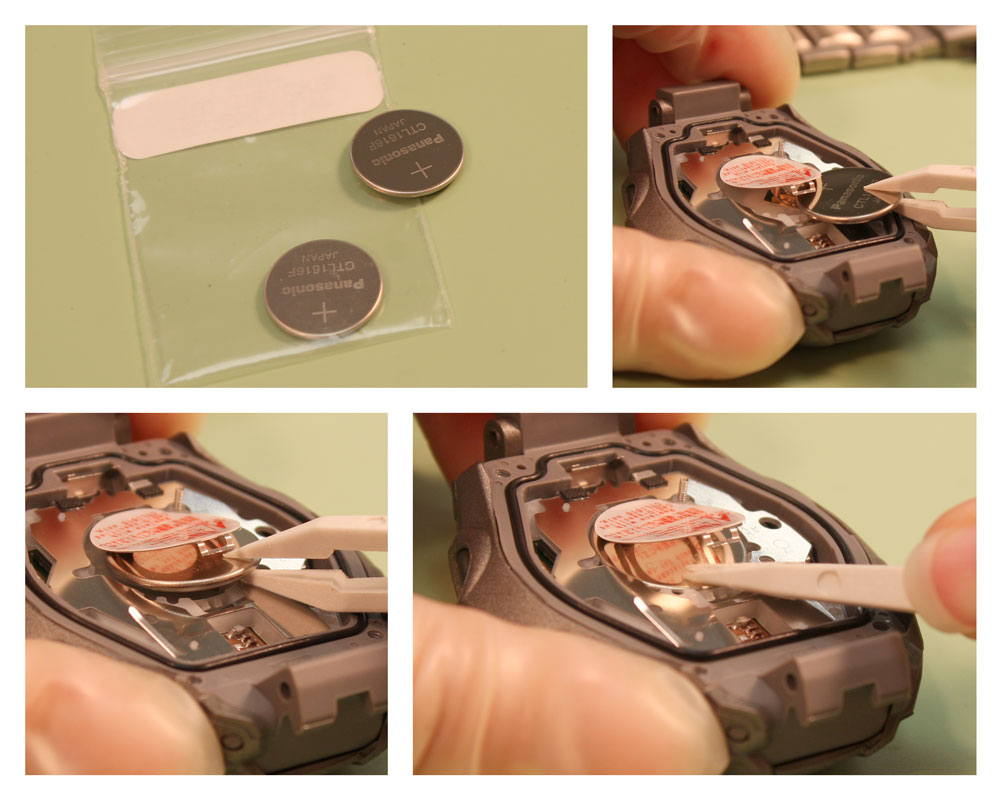
Take the new battery in your plastic tweezers, making sure that the positive side faces up – this is generally the side with the engraved number on it. Lift the strap up so you can easily slide the new battery under it and into the slot with the positive side is facing up. Once the battery is under the strap, you may need to push it into place in the compartment with your fingers.
Step 14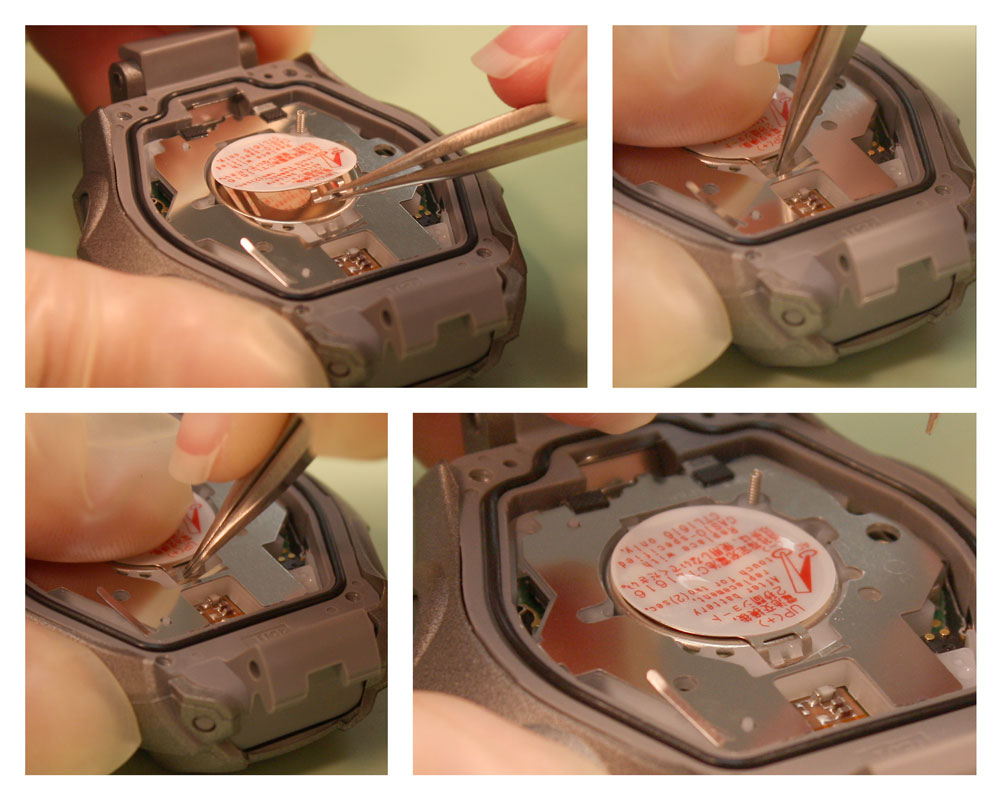
With the battery is in place, you can close the strap over it. Take your non-magnetic tweezers again and grip the tab of the latch that locks into place in the movement. Hold the movement steady with your free hand while you push down on the strap across the battery. Push the latch down with your tweezers and away from you toward the battery until it catches and stays closed. It might take more than one try to get it closed.
Step 16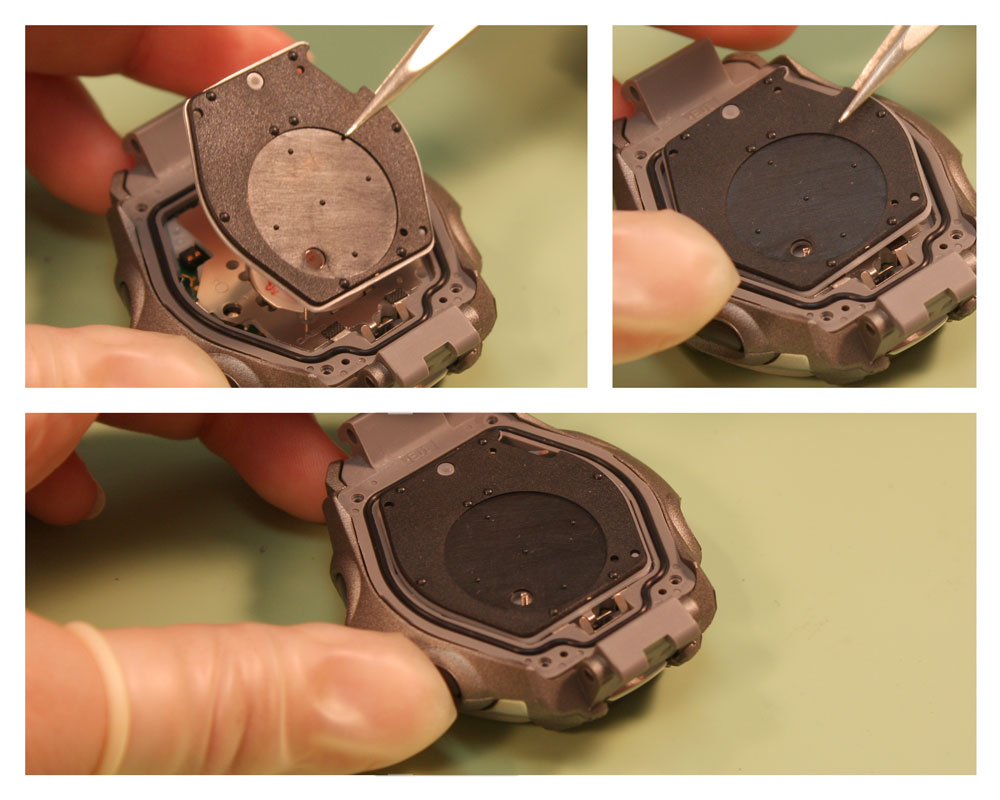
At this point, if the digital display is flashing, you can replace the white cover plate over the movement. Make sure that the holes for the contact springs are lined up with the holes for the contact springs in the movement. When the white cover is in place, next replace the black shock absorbing plate, again making sure that the holes for the springs line up with the holes in the white cover plate.
Step 18
Then, when all the watch parts have been put back where they belong in the watch case, it is time to close the watch case and replace the watch band. Lay the case back across the watch case, align the holes with the holes in the watch case and be sure the wider side of the back fits in the wider groove in the case. Use this article to learn How to Close a Watch Case Back with Screws.

Step 19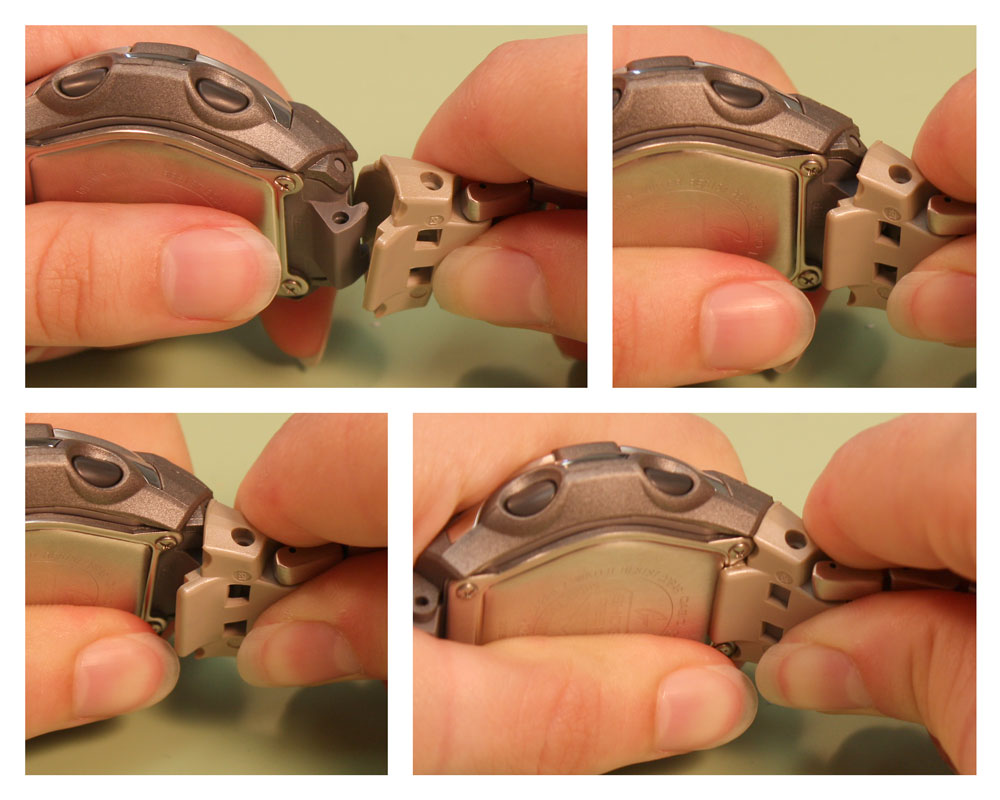
Once the back has been tightened back into place, you can replace the watch band. Pick up the watch band so you know which side of the watch case it attaches to. Insert the darker grey end link into the ivory end cap. Push the end cap in and rock it slightly back and forth until the end link snaps into place in the end cap.
Step 20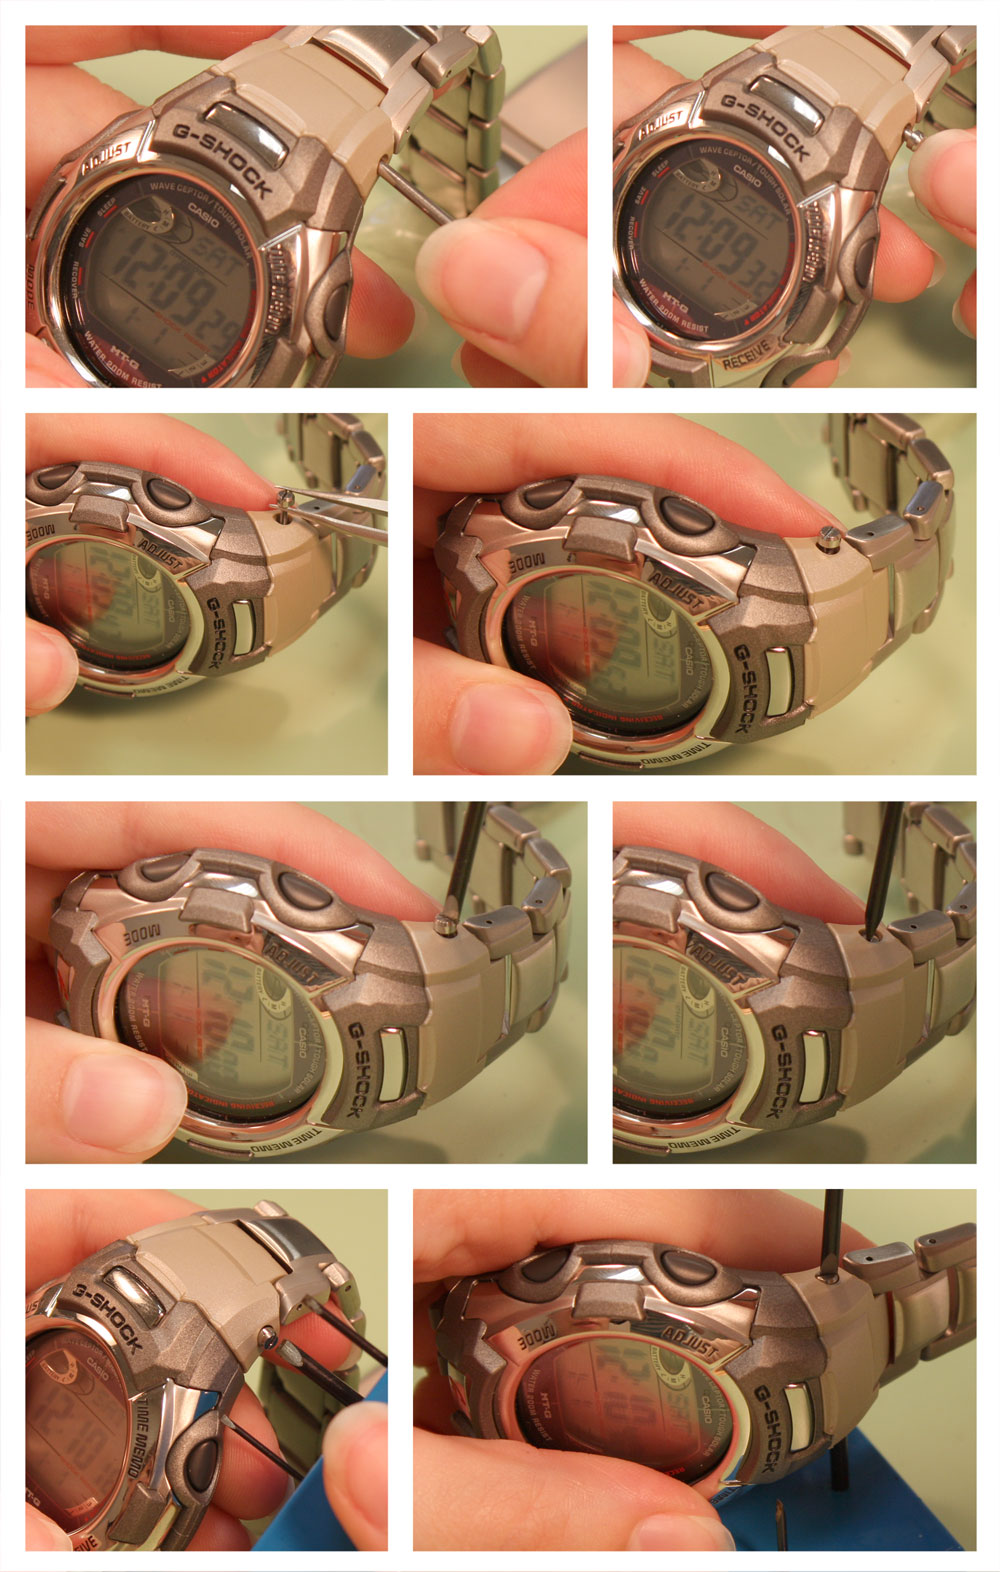
When the end cap and end link are connected together, take the first tube with the screw head end and insert it into the same side you removed it from. Push the tube into the end pieces from the Time Memo and Receive button side of the watch case. When the tube is in place, take one of the end cap screws and place it in the hole, twist it in clockwise once or twice to hold it in place.
Take the screwdriver block again and line the large screw head up with the side of the screw attached to the tube (the right side, with the Time Memo button). Turn the block and watch case so that you can access the loose screw head – it will be sticking up out of the end cap. Using your free flat head screwdriver, screw the screw back into place by turning it clockwise until you can’t turn it anymore.
Step 21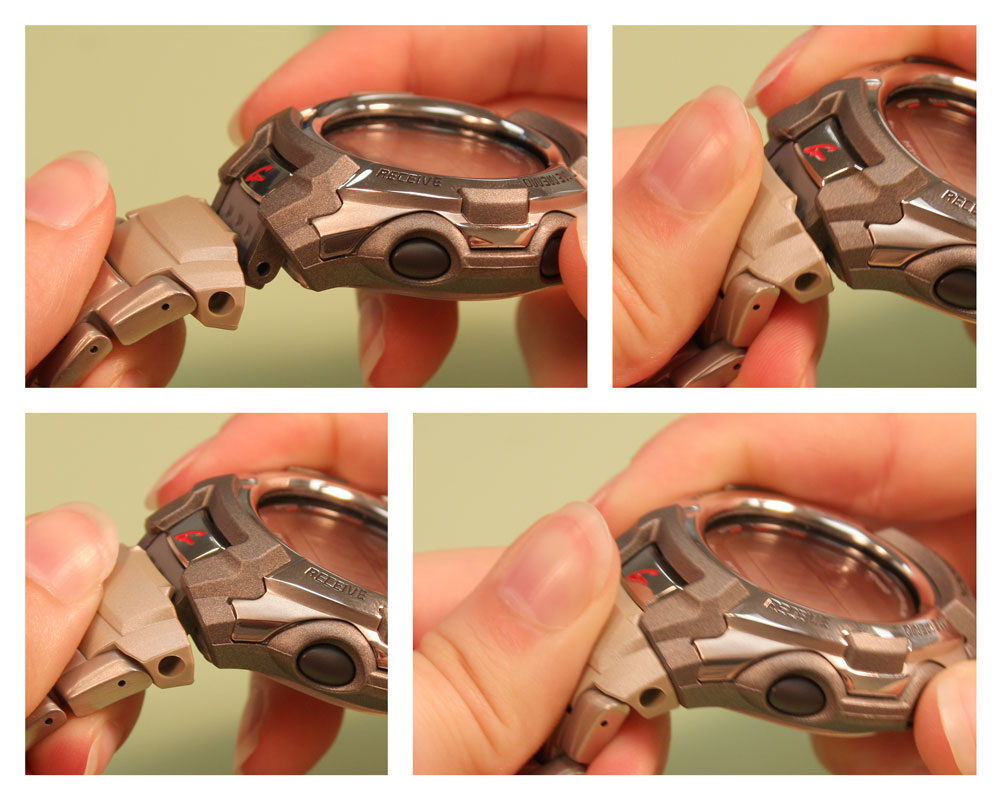
Remove the watch case from the screwdriver block and turn it so you can attach the other end of the watch band back to the watch case. Take the free end and insert the darker grey end link into the ivory end cap. Push the end cap in and rock it slightly back and forth until the end link snaps into place in the end cap.
Step 22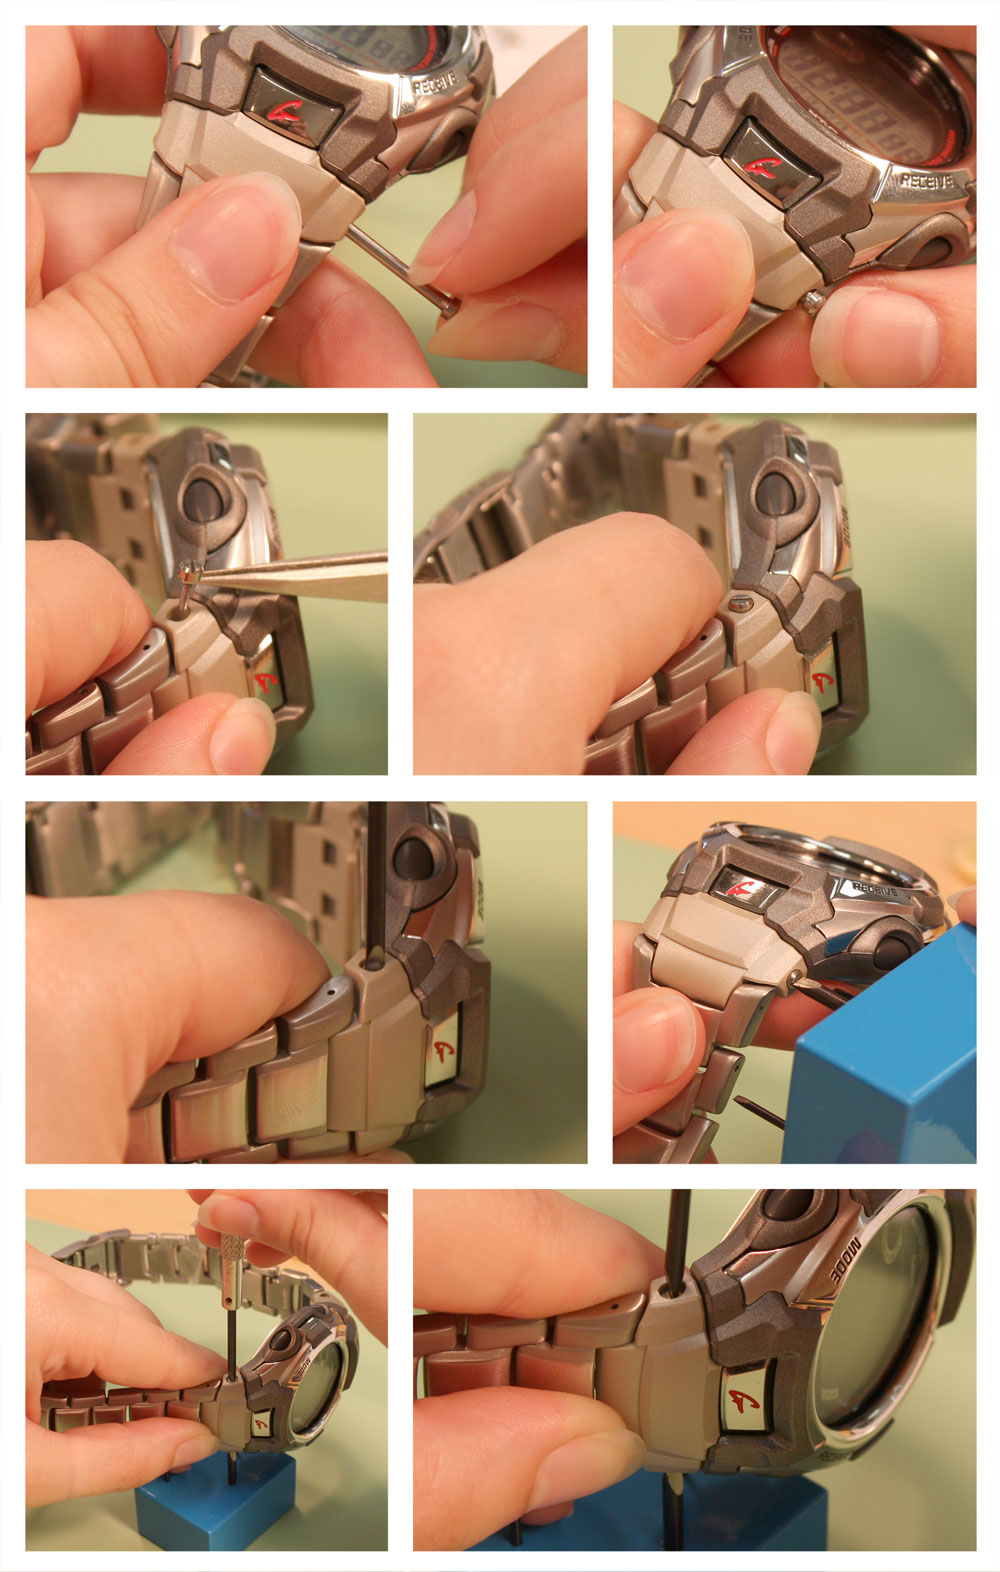
When the end cap and end link are connected together, take the first tube with the screw head end and insert it into the same side you removed it from. Push the tube into the end pieces from the Time Memo and Receive button side of the watch case. When the tube is in place, take one of the end cap screws and place it in the hole, twist it in clockwise once or twice to hold it in place.
Take the screwdriver block again and line the large screw head up with the side of the screw attached to the tube (the right side, with the Time Memo button). Turn the block and watch case so that you can access the loose screw head – it will be sticking up out of the end cap. Using your free flat head screwdriver, screw the screw back into place by turning it clockwise until you can’t turn it anymore.
Finished
 Once the back and band have been replaced, you should set the time and then place the watch face up under natural light for an hour to fully charge. At this point, you should look up your local battery recycling center so you can safely recycle the old battery. Lithium batteries can be very toxic and pose serious risks to children, so they must be disposed of properly. See our Battery Ingestion Warning for more information.




Thank you.
Hey, like your watches because the designed are outclass and stylish thanks for sharing the article. here I got useful stuff . Thanks for such an amazing article.
Awesome.
Such a great help! Now let me try this on my g shock watch! Hope everything goes in the right way!
Nice tutorial! This is the great help!
Thanks
Very Good Information About Casio G Shok.. Love to read again and again. as i am big fan of casio watches
Great history – Casio was founded by Tadao Kashio, who studied at the University of Waseda, in Tokyo. Casio started undertaking several subcontracting jobs in the mechanical industry before it launched an electric calculator in 1957.
Very good article
good information about rechargable watch cell in casio g-shock.knowledgable article
It was really nice of you to provide the best option to help me solve my issue with my g shock watch
nice website
thanks for the easy guide more understanding and got a lot from it
Lovely, I was amazed after seeing step 10. Wonderful Job
Thanks for the help. I will do it on my gshock as its battery is no more working.
Thanks for sharing this information.